 Skip to content

If you’re anything like me, sometimes you just need something outrageously decadent without a single burner or oven being turned on. That’s where this incredible Oreo Fudge comes in! Seriously, when the urge for that perfect crunchy-creamy combo hits, you need immediate satisfaction. I crafted this recipe because when I started Pure Cooking Joy, I wanted to share treats that brought pure joy without the stress. This is, without a doubt, The Easiest 3-Ingredient No-Bake Oreo Fudge you will ever make. Forget complicated candy making; we’re keeping things simple, fast, and ridiculously delicious. It’s my absolute favorite shortcut for instant comfort! If you want to read more about how I found this peace in the kitchen, check out my story over at Pure Cooking Joy.
- Why This 3-Ingredient Oreo Fudge Recipe is Your New Go-To Shortcut Fudge Recipe
- Gathering Ingredients for Your White Chocolate Oreo Fudge
- Step-by-Step Instructions for Perfect No Bake Oreo Fudge
- Tips for Success Making the Best Oreo Fudge
- Serving Suggestions and Gifting Your Oreo Fudge
- Storage and Reheating Instructions for Decadent Cookie Treat
- Frequently Asked Questions About Easy Oreo Fudge
- Estimated Nutritional Data for Simple Fudge Dessert
- Share Your Homemade Oreo Candy Creations
Why This 3-Ingredient Oreo Fudge Recipe is Your New Go-To Shortcut Fudge Recipe
Listen, I love baking traditional fudge, but sometimes you need cookie-and-cream goodness *right now*. That’s why this recipe is my favorite secret weapon. If you’re looking for a Shortcut Fudge Recipe that requires zero fuss and no oven time, you’ve hit the jackpot. This really is the ultimate No Bake Fudge!
We aren’t messing around with candy thermometers or worrying about crystallization. Trust me, the simplicity is shocking, but the results taste anything but simple. It’s guaranteed satisfaction every single time you mix it up.
Quick Fudge Recipe: Ready in Minutes
The best part? Your hands-on time is barely anything—we’re talking 10 minutes flat for prep! Compare that to old-fashioned fudge recipes that need constant stirring on the stove for ages. With this method, you microwave the chocolate, stir in the milk, fold in the cookies, and you’re done with the active work. It’s a true Quick Fudge Recipe winner for those busy weeknights or last-minute dessert emergencies.
The Secret to Easy Oreo Fudge: Minimal Ingredients
I mean it when I say three ingredients! That’s it. We rely on the magic combination of white chocolate, sweetened condensed milk, and those gorgeous Oreos to do all the heavy lifting. This incredible formula gives you that dreamy, melt-in-your-mouth texture you crave from good Easy Oreo Fudge without needing a pantry full of specialist items. If you’re hunting for a true 3 Ingredient Fudge, this is your winner.
Gathering Ingredients for Your White Chocolate Oreo Fudge
Okay, let’s get our short ingredient list together! Since we aren’t cooking anything, the quality of these three items really matters for our final White Chocolate Oreo Fudge. You only need 14 ounces of sweetened condensed milk, 24 ounces of white chocolate chips—make sure they are decent quality chips or wafers that melt well—and one whole package of Oreos, which should be about 14.3 ounces.
The recipe calls for those Oreos to be crushed, and trust me, you want the whole cookie, filling and all, because that creamy center helps bind everything beautifully!
Ingredient Notes and Substitutions for Oreo Fudge
When it comes to the white chocolate, I always tell people to check the bag. If it says “compound coating,” maybe skip it; we want real cocoa butter in there for the smoothest melt possible. If you want to experiment with Cookies and Cream Fudge but don’t have Oreos, you could try Teddy Grahams or even shortbread cookies, but it changes that classic flavor profile, so maybe save that for Batch Two!
Also, for crushing: I usually pulse the cookies quickly in my food processor. You want mostly fine crumbs but definitely some smaller chunks left in there so you get that satisfying crunch. Don’t let them turn into dust!
Step-by-Step Instructions for Perfect No Bake Oreo Fudge
Here is the part where we put it all together! Since this is a No Bake Fudge, the process is more about gentle combining than actual cooking. I’m going to walk you through this exactly how I do it, because melting white chocolate can sometimes be tricky if you rush it. When you follow these steps, you guarantee that smooth, creamy texture we are aiming for in this Simple Fudge Dessert.
Preparing Your Pan for the Oreo Fudge
First things first: grab that 8×8 inch pan. This is crucial for getting nice, thick squares! Line it completely with parchment paper, but here’s the pro move: leave plenty of overhang on two opposite sides. Think of it like creating little handles. Once the fudge is solid, you just use those edges to lift the whole beautiful block right out! Talk about easy cleanup!
Melting White Chocolate and Mixing the Base for this Simple Fudge Dessert
Put your white chocolate chips into a microwave-safe bowl. Now, listen close: microwave them in short bursts—only 30 seconds at a time. After every 30 seconds, you have to take it out and stir it really well, even if it doesn’t look melted yet. White chocolate burns fast! Once it’s completely smooth, pour in your sweetened condensed milk. Stir that mixture until it looks totally uniform and glossy. If it looks grainy, you likely overheated your chocolate, so next time just stir more often between those 30-second blasts!
Folding in Cookies and Setting the Crunchy Creamy Fudge Swirl
Now for the cookies! Gently fold those crushed Oreos right into the creamy chocolate base. You don’t want to smash them into dust; we want definition! Just stir until they look evenly distributed throughout the fudge mixture. Dump it all into your prepared pan and smooth the top out. If you want that extra fancy top for a beautiful Crunchy Creamy Fudge Swirl look, sprinkle a few extra crushed cookies over the top right now before it chills. Then, cover it up and move it to the fridge for at least two to three hours until it’s firm to the touch. If you want more tips on easy, no-bake recipes like this, you should check out my guide on easy no-bake rocky road fudge!

Tips for Success Making the Best Oreo Fudge
We’ve made the magic mix, but now we need that picture-perfect result! I’ve learned a few things over the years about turning this simple mixture into the Best Oreo Fudge that doesn’t crumble when you slice it. If you pay attention to just two things—temperature control and cutting technique—you’ll nail this every time. These tips are what take it from “good fudge” to “I can’t believe you made this!” This is stuff I learned through trial and error, sharing lots of slightly-too-soft batches with my friends, ha! If you’re looking for more of my best kitchen tricks, feel free to browse my general blog posts.
Achieving the Right Texture in Your Homemade Oreo Candy
Texture is everything in this Homemade Oreo Candy! The biggest culprit for gummy or grainy fudge is overheated white chocolate. Remember what I said about microwaving in short bursts? Stick to that! If the chocolate gets too hot, the cocoa butter separates, and you get that weird oily or grainy texture when it sets up. It’s a real mood killer.
Also, once you fold in those crushed Oreos, stop moving! Resist the urge to keep stirring to see if they are perfectly distributed. Over-mixing at this final stage can actually push air out of the melted base, making your gorgeous fudge dense instead of beautifully creamy. Stir just until you see no more white streaks of chocolate, and then immediately transfer it to the pan. Patience here pays off huge!
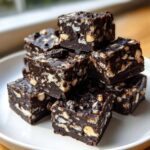
Cutting and Presentation for Party Fudge Squares
So, your fudge is chilled and solid—congratulations! Now, don’t ruin the finish by hacking at it with a dull knife. I wait until the fudge is thoroughly chilled, at least two hours minimum. To get those gorgeous, sharp edges for perfect Party Fudge Squares, grab a large, sharp knife and dip it into a mug of tall, hot water. Wipe the blade completely dry with a towel before making a clean cut downward.

Dip the knife back into the hot water and wipe it dry after *every single cut*. This keeps the blade hot enough to slice straight through the cold, rich fudge without dragging the chocolate and smearing the edges. It takes a little extra time, but the clean result is absolutely worth it for serving or gifting!
Serving Suggestions and Gifting Your Oreo Fudge
This Oreo Fudge is such a crowd-pleaser because it’s so rich; a little piece goes a long way! I love serving these little squares alongside a strong, hot cup of coffee when friends pop over unexpectedly. Since it’s so easy to make ahead, it’s perfect for impromptu gatherings.
For Fudge for Gifting, especially around the holidays, package these tight little squares in clear cellophane bags tied with a bright ribbon—they look so professional! You can even layer them in a decorative tin with some of my no-bake rocky road fudge for a mixed assortment. People absolutely adore getting homemade candy! If you make a batch, tag me on Facebook so I can see your beautiful work over at Pure Cooking Joy!

Storage and Reheating Instructions for Decadent Cookie Treat
Since this Oreo Fudge is such a luxurious and Decadent Cookie Treat, we want to make sure it stays perfectly fresh! The great news about this no-bake recipe is that it stores beautifully, which is why it’s such an amazing make-ahead dessert for parties or holidays.
Here’s the deal: you must keep it in the refrigerator. Because we are using white chocolate and sweetened condensed milk as our base—not cooked-down sugar—this fudge needs that cold temperature to stay firm and hold those sharp square shapes we worked so hard to cut.
Pop your fudge squares into a truly airtight container. If you stack them, make sure you put a sheet of wax paper or parchment paper between the layers. This stops them from sticking together, which can happen quickly! Stored this way, your Cookies and Cream Fudge stays wonderfully fresh and creamy for up to a week. I’ve honestly never had any last that long, but it’s good to know you have the option!
Now, about reheating—you don’t want to reheat this fudge at all! If you try to warm it up, you’ll end up with a pool of sweet, melted chocolate mess, not fudge. If you notice it gets a little too hard straight out of the fridge, just pull the container out about 15 minutes before you plan to serve it. That little bit of softening makes it perfect for biting into without being messy.
Frequently Asked Questions About Easy Oreo Fudge
I know you might have a couple of lingering questions, because when something seems this easy, you start wondering about the catches, right? Don’t worry! I’ve rounded up the most common things people ask about this Easy Oreo Fudge Recipe. It’s always better to ask than to risk messing up that gorgeous, simple batch!
Can I make this Oreo Fudge Recipe without an oven?
Yes, absolutely! That’s the beauty of it! This is one of those perfect No Oven Treats. We aren’t baking anything at all. The only heat we use is the microwave, which we use specifically to melt the white chocolate smoothly before we mix everything together. It’s genuinely one of the most hands-off dessert recipes out there!
What is the best way to crush the Oreos?
This is a great question because texture is key! I find the quickest, most reliable way is using a food processor. Just pulse it a few times until you get a mix of coarse crumbs and some smaller, sand-like bits. If you don’t have a processor, you can totally do it the old-school way! Put the cookies in a sturdy, resealable zip-top bag, push out as much air as you can, and just go to town smashing them with a rolling pin. It’s great for stress relief, honestly!
How long does this fudge really need to chill before I can eat it?
While the active prep time is fast, the chilling time is non-negotiable because we aren’t using gelatin or other stabilizers. You need a minimum of two hours in the fridge. I highly recommend aiming for three hours, though! When you pull it out after three hours, it should be completely firm and ready for clean cutting. If you try to cut it earlier, you’ll get a big sticky mess, and nobody wants that when making a beautiful Simple Fudge Dessert.
Can I use dark chocolate instead of white chocolate chips?
You certainly can experiment if you want a twist on the classic Cookies and Cream Fudge! If you swap out some or all of the white chocolate for semi-sweet or milk chocolate chips, you’ll get a darker, richer fudge. Just know that white chocolate is what creates that classic, sweet “cookies and cream” visual contrast, so dark chocolate will obviously change the final look!

If you have any other burning questions about making this the best batch of Fudge for Gifting, feel free to check out my tips on my easy peanut butter fudge recipe page for similar no-bake tips, or just drop a comment below!
Estimated Nutritional Data for Simple Fudge Dessert
Now, I always want to be super upfront with you all about what you’re making! Since this Oreo Fudge is made from scratch, and we’re using rich ingredients like white chocolate and condensed milk, those numbers add up fast. Please remember that all the values listed below are estimates, calculated based on the specific ingredients and measurements listed in the recipe. If you swap out the Oreos for a different cookie, or use dark chocolate, your final nutrition breakdown will definitely shift!
This is based on cutting the recipe into about 36 small squares, which is how I portion it out for quick treats. It’s perfect for knowing what you’re getting in a single bite of this Simple Fudge Dessert!
- Serving Size: 1 square
- Calories: 185
- Sugar: 22g
- Fat: 9g (Saturated Fat: 5g)
- Carbohydrates: 25g
- Protein: 2g
- Sodium: 105mg
See? It’s definitely a treat, but wow, is it worth every single sweet, crunchy bite! Enjoy it responsibly, maybe with a nice, big glass of water!
Share Your Homemade Oreo Candy Creations
Okay, now it’s your turn! I’ve shared all my secrets for making this incredible, easy Oreo Fudge, and honestly, watching you all recreate these simple desserts is the best part of what I do here at Pure Cooking Joy.
Once you’ve had a chance to chill your fudge and slice up those perfect squares, I would absolutely love to hear what you think! Did it set up perfectly? Were your guests impressed that it only took three ingredients? Please take a second to click the star rating right below this paragraph and leave your feedback.
If you post a picture of your gorgeous Homemade Oreo Candy creation on social media, please tag me! It genuinely makes my day to see my recipes out in the world, bringing joy to your tables. If you have any specific questions about storage or cutting that I didn’t cover, or if you just want to say hello, use the handy contact form over at Pure Cooking Joy.
Thank you so much for stopping by my kitchen today. I hope this quick, no-bake fudge brings a little bit of that pure cooking joy into your busy life!
PrintThe Easiest 3-Ingredient No-Bake Oreo Fudge
You can make this incredibly simple Oreo Fudge with just three ingredients. This no-bake recipe delivers creamy, crunchy cookies and cream flavor fast, making it perfect for quick treats or homemade gifts.
- Prep Time: 10 min
- Cook Time: 0 min
- Total Time: 190 min
- Yield: About 36 small squares 1x
- Category: Dessert
- Method: No-Bake
- Cuisine: American
- Diet: Vegetarian
Ingredients
- 14 ounces sweetened condensed milk
- 24 ounces white chocolate chips
- 1 package (about 14.3 ounces) Oreo cookies, crushed
Instructions
- Line an 8×8 inch baking pan with parchment paper, leaving an overhang on the sides for easy removal.
- Place the white chocolate chips in a microwave-safe bowl. Microwave in 30-second intervals, stirring well after each interval, until the chocolate is completely smooth.
- Pour the sweetened condensed milk into the melted white chocolate. Stir until the mixture is fully combined and smooth.
- Gently fold in the crushed Oreo cookies until they are evenly distributed throughout the fudge mixture.
- Pour the fudge mixture into the prepared pan and spread it evenly.
- Refrigerate the fudge for at least 2 to 3 hours, or until firm.
- Use the parchment paper overhang to lift the fudge out of the pan. Cut the fudge into small squares before serving.
Notes
- For a more intense chocolate flavor, you can substitute half of the white chocolate chips with semi-sweet chocolate chips.
- If you want a cleaner look, reserve about 1/2 cup of crushed Oreos to sprinkle on top before chilling.
- Store leftover Oreo Fudge in an airtight container in the refrigerator for up to one week.
Nutrition
- Serving Size: 1 square
- Calories: 185
- Sugar: 22
- Sodium: 105
- Fat: 9
- Saturated Fat: 5
- Unsaturated Fat: 4
- Trans Fat: 0
- Carbohydrates: 25
- Fiber: 0
- Protein: 2
- Cholesterol: 10
