 Skip to content

Oh, that craving hits you hard, doesn’t it? You’re thinking about that rich, satisfying Tex-Mex flavor, but the thought of dealing with a heavy deep fryer and all that oil just drains your energy. Trust me, I’ve been there! That’s why simplifying comfort food is my absolute mission here at Pure Cooking Joy. I figured out how to ditch the fryer completely and still get that perfect, golden, shatteringly crisp shell.
Get ready to make the best Baked Chicken Chimichangas you’ve ever tried. This recipe is straightforward, uses simple seasonings to mimic that classic restaurant flavor, and it proves you don’t need a vat of oil to achieve crispy perfection. I’m absolutely confident you can nail that crunchy texture right in your own oven, making this an instant favorite for weeknight chicken dinner rotation.
- Why You Will Love This Easy Baked Chicken Chimichangas Recipe
- Gathering Ingredients for Crispy Baked Chicken Chimichangas
- The Secret to Crispy Baked Chicken Chimichangas: Step-by-Step Instructions
- Making Ahead and Storing Your Baked Chicken Chimichangas
- Serving Suggestions for Your Oven Baked Mexican Food
- Troubleshooting Common Baked Chicken Chimichangas Issues
- Frequently Asked Questions About Baked Chicken Chimichangas Recipe
- Estimated Nutritional Information for Baked Chicken Chimichangas
- Share Your Crispy Baked Chicken Chimichangas Success
Why You Will Love This Easy Baked Chicken Chimichangas Recipe
I know time is precious, especially when you are trying to feed the family something exciting. That’s why I engineered this recipe to become your go-to Tex-Mex night staple. You aren’t sacrificing anything here—just the mess!
- Quick and Easy: We are looking at less than 45 minutes total time, making these Baked Chicken Chimichangas perfect for when dinner needs to happen fast.
- Guilt-Free Crunch: You get that sought-after crispy shell, achieved entirely in the oven. It’s legitimately lighter but still tastes totally decadent.
- Family Approved: The filling is kid-friendly, zesty, and just packed enough to make everyone ask for seconds.
Gathering Ingredients for Crispy Baked Chicken Chimichangas
Okay, before we get to the magic part—the baking—we have to talk about our building blocks. Getting the right stuff and measuring it precisely is truly what separates a good chimichanga from a fantastic, restaurant-quality one. Remember, we are aiming for that Crispy Baked Chicken Chimichangas texture, and a soggy filling is our sworn enemy here!
Here is exactly what you need for the filling, which is where most of the flavor really comes from:
- 2 cups cooked, shredded chicken
- 1 tablespoon olive oil
- 1 teaspoon chili powder
- 1 teaspoon ground cumin
- 1/2 teaspoon garlic powder
- 1/2 teaspoon dried oregano
- 1/4 teaspoon salt
- 1/4 teaspoon black pepper
- 1/2 cup chicken broth
- 1/2 cup shredded Monterey Jack cheese
- 1/2 cup shredded cheddar cheese
- 8 (8-inch) flour tortillas
- Cooking spray or 2 tablespoons melted butter for brushing
Don’t worry if you need a shortcut; I have some great tips on how to keep this moving, especially for a busy shredded chicken recipes baked night.
Ingredient Notes and Substitution Tips
Let’s talk specifics so you can stop worrying about the results. First, the chicken: if you are making this a true weeknight dinner, skip cooking chicken from scratch! Grab a store-bought rotisserie chicken, shred what you need, and you’ve shaved 20 minutes right off the top. It works perfectly.
When it comes to cheese, I love the blend of Monterey Jack and Cheddar. The Jack melts beautifully and gets gooey, while the Cheddar gives us that necessary sharp flavor pop. Just make sure you don’t overdo it! Too much cheese, especially when combined with any liquid, equals potential leakage, and we want that filling contained so those tortillas can get truly crispy.
The Secret to Crispy Baked Chicken Chimichangas: Step-by-Step Instructions
Alright, this is where the magic happens! Making these Baked Chicken Chimichangas is truly about technique, not complicated steps. Forget the frying pan—we are going straight to the oven. The overall goal, especially for a great bake, is making sure that filling has flavor but isn’t swimming in liquid. That’s the number one enemy of crunch!
Preparing the Flavorful Chicken Filling
First things first, get your oven preheated to 400°F (200°C). We want it hot and ready to work! In a bowl, grab your shredded chicken and toss it with all those amazing spices: the chili powder, cumin, garlic powder, oregano, salt, and pepper. Mix it around until every piece is coated—it should smell incredible already.
Now, gently stir in that half-cup of broth. Look, I know we need moisture, but listen closely: you want the chicken mixture to be moist, sure, but definitely *not* soupy. If it looks watery, leave some broth behind. Too much liquid here means a soggy tortilla, and we worked too hard promising ourselves a crispy result!

Rolling and Sealing Your Baked Chicken Chimichangas
Time to assemble! Divide your flavor bomb filling evenly across your eight tortillas. Sprinkle that blend of Jack and Cheddar right on top of the chicken mix. Now, use the proper burrito technique: fold those two sides toward the center first, like closing an envelope. This helps keep the cheese trapped inside.
Once the sides are tucked in, roll it up tightly from the bottom. You want a snug little package! Place them all seam-side down on your baking sheet. If they are loose, they will uncurl! Laying them seam-side down keeps them secure while they bake into those fantastic, golden cylinders.

Baking for Maximum Crunch
This next step is non-negotiable if you want that Oven Baked Mexican Food texture we’re aiming for. Take your cooking spray or melted butter—I love melted butter for the richer taste—and give the tops and sides of every rolled chimichanga a really generous brushing or spray. Don’t be shy here; this fat is what’s going to crisp up the flour tortilla!
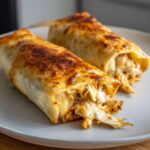
Pop them into that 400°F oven for about 15 to 20 minutes total. The trick? You absolutely must flip them halfway through baking. This ensures both sides get that beautiful, golden-brown crunch we’ve been dreaming about. Pull them out when they look perfectly toasty!

For more fun, flavorful meals that simplify your weeknights, check out my easy chicken bites recipe—it’s another winner!
Making Ahead and Storing Your Baked Chicken Chimichangas
One of the reasons I love simplifying comfort food so much is that it usually means we can plan ahead, right? This recipe is fantastic for that! If you’re prepping for game day or just want to avoid doing dishes on a busy Tuesday, you can totally assemble these ahead of time.
For your Make Ahead Chimichangas, you’ll want to follow steps one through five—mix the filling, stuff the tortillas, fold, and roll them up tight. Place them seam-side down on your baking sheet, just like you would if you were baking them immediately. Then, cover the whole tray tightly with plastic wrap and pop them in the fridge. This way, they are ready to go whenever you are!
Here’s the crucial bit: if you bake them straight from the refrigerator, they are colder in the middle, so you can’t rush it. You’ll need to add about 5 to 10 extra minutes to the baking time specified in the main instructions. You absolutely still need to brush them with that butter or cooking spray *before* they go into that 400°F oven though—that’s what ensures they still get crunchy!
If you want to freeze them instead, that’s easy too! Just wrap each assembled chimichanga individually in plastic wrap, then place them all in a freezer-safe bag. To reheat from frozen, just pop them on a lined sheet, spray them, and bake at 400°F for maybe 30 to 35 minutes, flipping halfway. Honestly, having these homemade make ahead chimichangas waiting makes any weeknight feel like a win!
Serving Suggestions for Your Oven Baked Mexican Food
Okay, so your Baked Chicken Chimichangas are golden brown, perfectly crunchy, and still piping hot off the baking sheet. Now comes the fun part: loading them up! Serving these isn’t just about putting them on a plate; it’s about building a whole experience. Since we kept the filling light to maximize our crispiness, we should go big on the toppings to make this feel like a true Tex-Mex feast.
For me, presentation is half the battle when serving something like this as an Oven Baked Mexican Food option. I usually line up little bowls of toppings right on the table so everyone can customize their own plate. It keeps things informal and fun.

Here are my absolute favorite ways to dress up these chimichangas:
- The Cool Down Crew: You simply cannot skip sour cream or Greek yogurt. It perfectly cuts through the richness of the cheese and the spice of the chicken.
- Green Goodness: Fresh, chunky guacamole is a must. I even make a simplified version of my famous easy layer dip sometimes, just using the top few layers!
- Salsa Spectrum: Offer mild Pico de Gallo and something spicier, maybe a smoky salsa roja. This lets everyone control the heat level.
- The Sideshow Stars: You need something hearty alongside! Simple Spanish rice or some creamy refried beans (or black beans if you prefer something lighter) make this a complete family meal.
Honestly, stacking one of these crunchy lovelies on a plate next to some rice and piling on that cool sour cream? That’s pure cooking joy right there, my friends. Don’t forget a squeeze of fresh lime juice over the top just before serving; that bright acidity wakes everything up!
Troubleshooting Common Baked Chicken Chimichangas Issues
Even though these Baked Chicken Chimichangas are incredibly straightforward, sometimes things don’t go exactly to plan, right? Don’t panic if you run into a little snag! Usually, any issue comes down to moisture control or temperature. When you’re baking instead of frying, you have to be a bit more deliberate about keeping things dry!
I’ve run into every mistake possible over the years, mostly when I’m rushing through prepping a big batch of Tex Mex Dinner Recipes, so I want to save you the trouble. Here are the few issues people commonly run into and exactly how I fix them.
Why Are My Chimichangas Soggy Instead of Crispy?
This is the number one problem people have when they switch from deep-frying to baking, and the answer is almost always the filling. Remember how I stressed that the chicken shouldn’t be watery? If you skipped draining the broth or if you used salsa that was too liquidy in the seasoning mix, that moisture steams the tortilla instead of letting it crisp up.
The fix is easy for next time: make sure your shredded chicken mixture is just *moist enough* to hold together when you squeeze it gently. If you see liquid pooling on the bottom of your mixing bowl—that’s your warning sign! For this batch, if you’ve already rolled them and they look a little damp, give them an extra generous brush of butter—more fat equals more crunch protection—and add five extra minutes to your bake time, flipping halfway through.
Help! My Tortillas Are Tearing When I Roll Them
Oh, those stubborn flour tortillas! If you try to roll a cold, straight-from-the-bag tortilla, it’s going to crack or tear every single time. Tortillas are like people, they need to be warmed up and softened before you ask them to bend!
For really flexible, rollable tortillas, try wrapping the stack in a damp paper towel and popping them in the microwave for about 20 to 30 seconds before you start assembly. They don’t need to be hot, just warm and pliable. This simple, quick step turns them into bendable wrappers, making this an incredibly Easy Baked Chimichangas process rather than a wrestling match!
Why Is Cheese Leakage Happening Everywhere?
We love cheese, but we don’t want it dripping all over our baking sheet looking like a yellow lava flow! Cheese leakage usually happens for two reasons: the filling was too abundant, or you didn’t properly seal the wrapper.
Make sure you are leaving about a half-inch border on the top edge after you fold in the sides. That way, when the cheese melts and expands, it’s melting onto the *other* tortilla layers instead of running out the bottom gap. Also, make sure you are rolling them tightly! A tight roll keeps everything pressurized and contained inside where it belongs. If you see a spot that looks thin or weak on your roll, you can dab a tiny bit of water on that seam to help seal it shut before baking.
Frequently Asked Questions About Baked Chicken Chimichangas Recipe
I get questions all the time about tweaking recipes, especially when we’re trying to make classic comfort food fit into our busy lives. Since this recipe is designed to be both Healthy Chicken Chimichangas and super crispy, I’ve pulled the most common inquiries right here so you can bake with total confidence!
Can I use pre-made salsa inside my Baked Chicken Chimichangas?
This is a great question that gets right to the heart of achieving crispiness! If you are using canned salsa straight from the jar, I would strongly advise against adding it directly to your chicken filling. Salsa is mostly liquid, and as I mentioned earlier, liquid is the sworn enemy of a puffy, crunchy tortilla shell when you’re baking.
If you absolutely love that tomato/onion/cilantro flavor, here’s my trick: use only the dry spices listed in the recipe. Then, once the chimichangas are golden brown and out of the oven, serve them with a side of chunky, fresh Pico de Gallo to dip into. That way, you get the vibrant flavor without sacrificing the crunch of your Baked Chicken Chimichangas Recipe!
How do I make these Healthy Chicken Chimichangas even lighter?
The beauty of this particular recipe is that by baking instead of frying, we’ve already made a huge positive shift away from heavy food! We’ve kept the fat low by only brushing them lightly with butter or spray, which is already a big win for any Guilt Free Chimichangas plan.
If you want to shave off a few more calories or fat grams, the easiest place to adjust is the cheese. You can use a reduced-fat Monterey Jack or Cheddar blend. Also, feel free to cut the amount of cheese in half—say, one tablespoon per chimichanga instead of two. It’s still going to melt nicely and hold things together, but it lightens the load significantly. Just watch for leakage if you use less cheese, as the cheese acts as a bit of glue!
Can I use this recipe for a Weeknight Chicken Dinner if I use store-bought rotisserie chicken?
Yes, yes, a thousand times yes! That is one of my favorite shortcuts for making this a lightning-fast Weeknight Chicken Dinner. Using high-quality, pre-cooked rotisserie chicken is the key to getting this on the table in under 35 minutes. You just shred the meat, toss it with those zesty spices, add the broth, and go! It works perfectly. If you ever need tips on shredding or prepping that pre-cooked bird, I have a whole guide on how to shred chicken that makes it mess-free.
If you ever want to try a similar technique but want to skip the oven altogether for an even quicker result, you can totally adapt these into an Air Fryer Chicken Chimichangas Alternative! I’ve got specific instructions for that crisping method over on my site.
Estimated Nutritional Information for Baked Chicken Chimichangas
I always like to give you guys a heads-up on what you are diving into when you make one of my recipes. I calculated the basic nutritional breakdown for these Baked Chicken Chimichangas based on two chimichangas per serving, assuming you aren’t piling on a ton of sour cream or guacamole afterward. Because we are baking them, you’re getting that fantastic flavor with a fraction of the oil you’d see in a deep-fried version!
Remember, this is just my best estimate. The actual numbers can swing a little depending on the brand of tortillas you grab or exactly how much cheese you manage to sneak in there (guilty as charged sometimes!).
Here is the general overview for two chimichangas:
- Serving Size: 2 chimichangas
- Calories: 380
- Fat: 15g
- Saturated Fat: 6g
- Trans Fat: 0g
- Cholesterol: 65mg
- Sodium: 450mg
- Carbohydrates: 38g
- Fiber: 2g
- Protein: 25g
- Sugar: 2g
Seeing that high list of protein is fantastic—that filling really packs a punch! This is why I call this a “guilt-free delight” sometimes. You get a satisfying, hearty meal that keeps you feeling full longer, and you’ve controlled the fat by baking it yourself. It’s a win-win for a busy weeknight!
Share Your Crispy Baked Chicken Chimichangas Success
I really hope you enjoyed making these! For me, seeing a perfect, golden, crunchy chimichanga come out of the oven without a deep fryer nearby is just the best feeling. It proves we can have our Tex-Mex cake and eat it too, right?
Now, I need your help building this community of joyful home cooks! Once you’ve tried these **Baked Chicken Chimichangas**, please, please come back here and let me know how they turned out. Did you nail that crispiness everyone wants? Did your family love the Chi-Chis Style Chimichangas flavor?
Leaving a rating really helps other people feel confident trying the recipe, and your comments inspire me every single day. If you snapped a photo of your golden delights, I’d absolutely love to see it! Tag me on social media—that’s always the highlight of my week. You can find me over on my general blog page, and you can connect with the community directly over on Facebook.
Keep cooking with joy, keep experimenting, and I’ll see you in the next recipe!
PrintEasy & Crispy Baked Chicken Chimichangas Recipe (Chi-Chi’s Style)
You can make satisfying, restaurant-quality chicken chimichangas at home without the deep fryer. This easy baked chicken chimichangas recipe delivers a crispy, golden shell and a flavorful shredded chicken filling, perfect for a weeknight chicken dinner.
- Prep Time: 15 min
- Cook Time: 20 min
- Total Time: 35 min
- Yield: 4 servings 1x
- Category: Dinner
- Method: Baking
- Cuisine: Tex-Mex
- Diet: Vegetarian
Ingredients
- 2 cups cooked, shredded chicken
- 1 tablespoon olive oil
- 1 teaspoon chili powder
- 1 teaspoon ground cumin
- 1/2 teaspoon garlic powder
- 1/2 teaspoon dried oregano
- 1/4 teaspoon salt
- 1/4 teaspoon black pepper
- 1/2 cup chicken broth
- 1/2 cup shredded Monterey Jack cheese
- 1/2 cup shredded cheddar cheese
- 8 (8-inch) flour tortillas
- Cooking spray or 2 tablespoons melted butter for brushing
Instructions
- Preheat your oven to 400°F (200°C). Lightly grease a baking sheet or line it with parchment paper.
- In a medium bowl, combine the shredded chicken, olive oil, chili powder, cumin, garlic powder, oregano, salt, and pepper. Mix well to coat the chicken evenly.
- Stir in the chicken broth until the mixture is moist but not watery.
- Divide the chicken mixture evenly among the 8 tortillas, placing the filling slightly off-center. Sprinkle about 2 tablespoons of the cheese mixture over the chicken in each tortilla.
- Fold the sides of the tortilla inward over the filling. Then, tightly roll the tortilla up from the bottom edge, creating a snug cylinder. Place the chimichangas seam-side down on the prepared baking sheet.
- To achieve maximum crispiness, lightly brush the tops and sides of each rolled chimichanga with cooking spray or melted butter.
- Bake for 15 to 20 minutes, flipping them halfway through, until they are golden brown and crispy.
- Remove from the oven and let them cool for a few minutes before serving with your favorite toppings like salsa or sour cream.
Notes
- For the crispiest results, ensure your chicken filling is not too wet before rolling the tortillas.
- If you are making these ahead of time, assemble them, place them seam-side down on a baking sheet, cover, and refrigerate for up to 24 hours. Add 5-10 minutes to the baking time if baking straight from the refrigerator.
- You can substitute pre-cooked rotisserie chicken for the shredded chicken to make this an even quicker weeknight chicken dinner.
Nutrition
- Serving Size: 2 chimichangas
- Calories: 380
- Sugar: 2
- Sodium: 450
- Fat: 15
- Saturated Fat: 6
- Unsaturated Fat: 9
- Trans Fat: 0
- Carbohydrates: 38
- Fiber: 2
- Protein: 25
- Cholesterol: 65
