 Skip to content
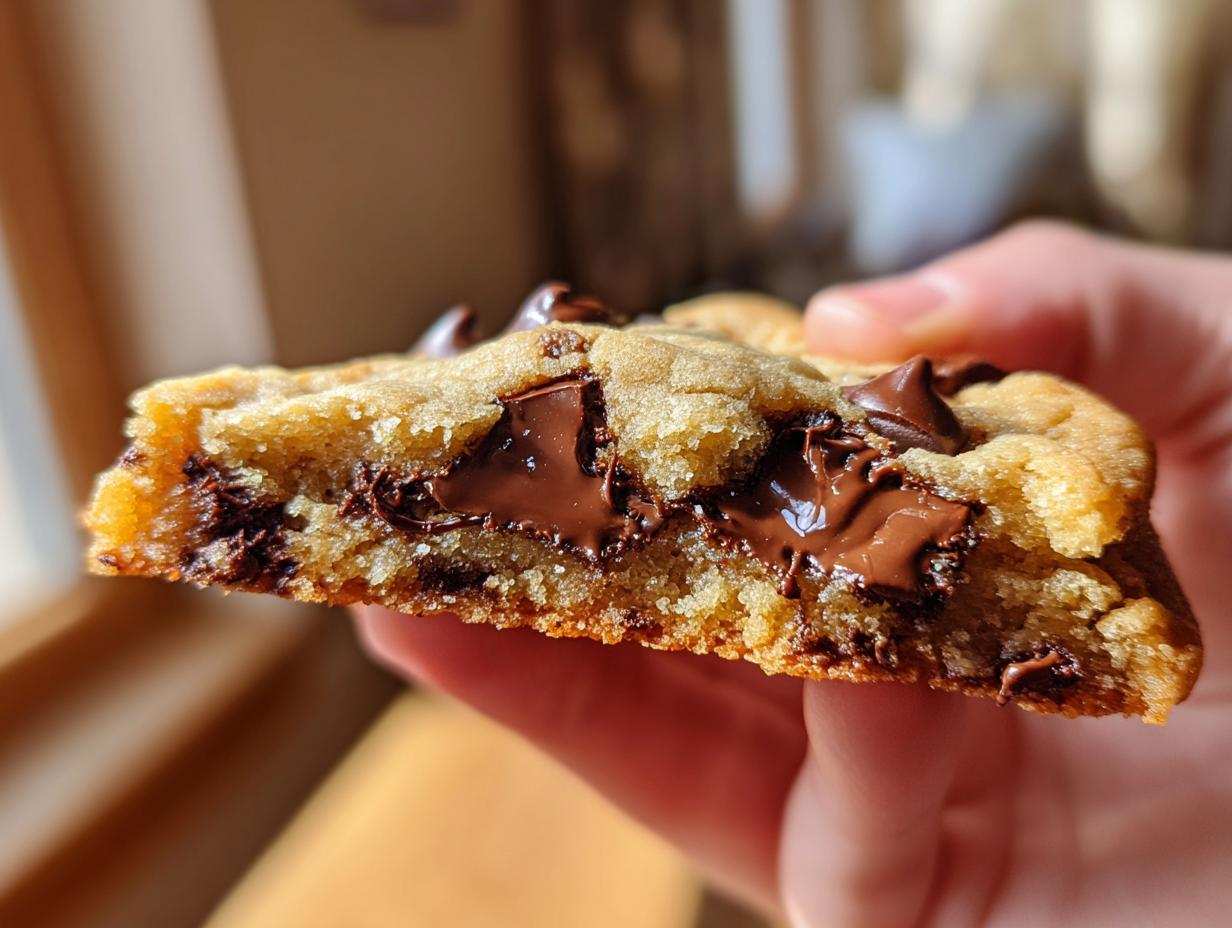

You know that feeling, right? That sudden, non-negotiable need for a warm, gooey chocolate chip cookie that actually tastes like it came from a high-end bakery? I totally get it. For years, I chased that perfect combination—thick, soft in the middle, and just slightly crisp around the edges. After countless batches and testing every trick out there, I am thrilled to tell you that I finally nailed the ultimate recipe for **homemade chocolate chip cookies**. This isn’t just another recipe; this is the result of serious testing here at Pure Cooking Joy, designed to deliver absolute cookie perfection every single time you bake!
- Why This is the Best Chocolate Chip Cookie Recipe for Homemade Chocolate Chip Cookies
- Gathering Ingredients for Your Homemade Chocolate Chip Cookies
- Step-by-Step Instructions for Perfect Homemade Chocolate Chip Cookies
- Tips for Ultimate Homemade Chocolate Chip Cookies Success
- Storage and Reheating Instructions for Homemade Chocolate Chip Cookies
- Variations on Classic Chocolate Chip Treats
- Frequently Asked Questions About Homemade Chocolate Chip Cookies
- Nutritional Estimates for These Homemade Chocolate Chip Cookies
- Share Your Ultimate Chocolate Chip Cookie Creations
Why This is the Best Chocolate Chip Cookie Recipe for Homemade Chocolate Chip Cookies
I’ve tried so many recipes that promise the world but deliver flat, crispy discs. Not this one! This truly is the **Best Chocolate Chip Cookie Recipe** because we skip complicated steps and focus only on what matters for texture. We are aiming for that thick, substantial cookie that resists sinking into a puddle in the oven.
What makes these cookies unbeatable is the balance that gives you that famously soft, gooey center contrasting beautifully with the crispy edges. The best part? You can have these amazing treats ready, from start to finish, in under 30 minutes. I even put together a guide on my secret tricks for retaining that bakery-style chew if you want to dive deeper into the science!
Achieving Bakery Style Cookies Texture
The secret to the **Perfect Cookie Texture** starts before you even add the flour. We spend a little extra, maybe three full minutes, creaming the butter and sugars together. Don’t rush this part! You aren’t just mixing things; you are whipping tiny air pockets into that base fat.
These little air bubbles are what give the dough structure when it hits the heat, preventing it from spreading out into thin wafers. This simple technique guarantees you get those wonderfully thick and chewy cookies we are after. Trust me, spending that extra minute with your mixer makes a world of difference in achieving that signature bakery feel.

Gathering Ingredients for Your Homemade Chocolate Chip Cookies
Okay, now that we know *what* we’re making, let’s talk about sourcing our goodies! For truly superior-tasting **homemade chocolate chip cookies**, ingredient quality is huge. I’ve listed out exactly what you need below. Please pay close attention to the state of the butter—it needs to be properly softened, not melted!
- 1 cup (2 sticks) unsalted butter, softened
- ¾ cup granulated sugar
- ¾ cup packed light brown sugar
- 2 large eggs
- 1 tablespoon vanilla extract
- 2 ¼ cups all-purpose flour
- 1 teaspoon baking soda
- ½ teaspoon salt
- 1 ½ cups semi-sweet chocolate chips (or a mix of milk and dark)
Using good, quality ingredients makes such a difference here. We don’t want flavorless cookies, right? If you’re ever looking for deep, nutty flavor, check out my notes on making your butter brown first—it’s amazing!
Ingredient Notes and Substitutions for Homemade Chocolate Chip Cookies
Here’s where I share the little insider secrets. First, butter temperature is everything for those thick cookies. If your butter is too cold, it won’t cream properly. If it’s melted, your cookies will spread into thin lace cookies, and we don’t want that!
Second, chocolate! I insist on using at least a mix of semi-sweet and dark chocolate chips. For maximum melty pockets, try folding in some chocolate chunks alongside your chips—they don’t bake down as much. This guarantees those big, gorgeous pools of melted chocolate when you bite into your **buttery chocolate chip cookies**.

Step-by-Step Instructions for Perfect Homemade Chocolate Chip Cookies
Alright, let’s get baking! This is the fun part where everything comes together. You’ll find these instructions are super straightforward, which is exactly what we aim for here at Pure Cooking Joy. We are making **Easy Homemade Cookies**, remember? First things first: get your oven cranked up to 375°F (190°C). Make sure you line your baking sheets with parchment paper—this is a lifesaver for cleanup and helps them bake evenly so you don’t end up with scorched bottoms.
We’ll run through this in a few phases, starting with the wet ingredients and ending with that crucial baking time. Don’t worry about needing fancy equipment; a big bowl and a hand mixer (or even just a sturdy wooden spoon) will do the job perfectly!
Mixing the Dough for Thick and Chewy Cookies
Take your softened butter, white sugar, and that beautiful packed brown sugar and beat them together. Like I mentioned before, we are beating them until they look genuinely light, pale, and fluffy—that only takes about three minutes with a mixer. Now, drop in your eggs one at a time, mixing completely after each one, and stir in that lovely vanilla extract.
In a separate bowl, whisk your flour, baking soda, and salt together—this ensures your leavening agent is distributed evenly. Now, add the dry stuff to the wet stuff slowly! Mix on low speed, only until you see the flour streaks just disappear. Stop mixing right there! If you keep going, you’ll get tough cookies, and we want that **Perfect Cookie Texture** instead!
Once it’s barely combined, grab your spatula and fold in those 1 ½ cups of chocolate chips. Folding gently keeps all those air bubbles we worked so hard to create intact!
Baking Homemade Chocolate Chip Cookies for Soft Gooey Center Cookies
Now we scoop! Drop rounded tablespoons of that perfect dough onto your prepared sheets, making sure they have about two inches to spread. If you want maximum thickness, go ahead and mound the dough slightly on top of itself. Bake them for just 9 to 12 minutes.
This is the make-or-break moment for getting **Soft Gooey Center Cookies**! You want to pull them out when the edges look perfectly golden brown, but the centers still look slightly damp and puffy. They will continue to bake and set up while they rest, which locks in that gooey middle we crave. Seriously, don’t second-guess this—they should look slightly underdone when they leave the oven.

Let them chill out on the hot baking sheet for a full five minutes. This allows them to firm up just enough so they don’t fall apart when you move them. Then, gently transfer them to a cooling rack. If you feel like these tips are helpful, you might want to check out my other guide on simple baking recipes for later this week!
Tips for Ultimate Homemade Chocolate Chip Cookies Success
So, you’ve mixed the dough, but you want to guarantee these **homemade chocolate chip cookies** are thick and chewy every single time? We aren’t done yet! A few simple hacks can take you from a good cookie to the best one you’ve ever made. Remember, baking is fun, but a little planning goes a long way toward avoiding disappointment.
My biggest tip for stopping those cookies from spreading into thin, sad circles? Chill the dough! Even just 30 minutes in the fridge makes a huge difference. The cold fat doesn’t melt as quickly when it hits the hot oven, keeping your cookie sturdy, thick, and chewy. Trust me on this one; chilling is the best cookie hack!
Also, always use room temperature eggs and butter that is softened, but not oily or shiny. If you want even more custom tricks for creating a perfect batch every time, I cover them all in my favorite chocolate chip cookie hacks post. High-quality chocolate chips are non-negotiable too—don’t skimp there if you want superior flavor!
Storage and Reheating Instructions for Homemade Chocolate Chip Cookies
Now, the toughest part of baking these amazing **homemade chocolate chip cookies**: trying not to eat them all in one sitting! If you somehow manage to save a few (good for you!), keeping them fresh is simple so they stay that wonderful “melt in your mouth” quality.
For the best results, you have to let them cool completely on the wire rack first. Seriously, don’t rush this. Once they are totally cool, store them in an airtight container at room temperature. If you seal them up while they are still warm, the moisture gets trapped, and you’ll end up with soggy cookies, which ruins that desired crispy edge!
They stay wonderfully soft for about three or four days stored this way. If you have a monster batch, you can totally freeze them, too! Lay them flat on a baking sheet until firm, then transfer them to a heavy-duty freezer bag. They last great for up to three months!

Need that fresh-out-of-the-oven experience later? No problem. Just take a cookie (or two, I won’t judge!) and pop it in the microwave for about 8 to 10 seconds. It warms up the chips and softens the center right back up. It’s pure magic and brings back that immediate, gooey delight!
Variations on Classic Chocolate Chip Treats
While this recipe is absolutely perfect as is—the gold standard for **Classic Chocolate Chip Treats**—I know you creative bakers out there love to customize! And honestly, I encourage a little experimentation once you’ve mastered the basic formula. You don’t need to drastically change things to get a completely new, exciting cookie experience. Sometimes the smallest addition makes the biggest impact on flavor!
If you want to add a little crunch and complexity, try tossing in about a half-cup of toasted pecans or walnuts along with your chocolate chips. Just make sure they are cool before folding them in gently. Everyone loves a treat with a little extra texture, trust me!
Another simple game-changer is the chocolate itself. I already mentioned doubling up on sweetness by mixing semi-sweet with dark, but have you ever tried white chocolate chips with dried cranberries? It tastes incredible, almost like a sophisticated scone in cookie form! Or, for the ultimate grown-up cookie, use milk chocolate chips and finish the tops of the dough mounds with a tiny sprinkle of flaky sea salt right before baking. That pop of salt against the sweet, buttery dough is just heavenly.
If you’re looking to totally switch up peanut butter week, I have a dedicated recipe for those, but feel free to toss some peanut butter chips into this base recipe for a fun twist. You can see my whole rundown on peanut butter chocolate chip cookies if you want to get really adventurous!
Frequently Asked Questions About Homemade Chocolate Chip Cookies
It’s totally normal to have questions when you’re baking up something you want to be absolutely perfect! I’ve gathered the ones I get asked most often about making these **homemade chocolate chip cookies**. Knowing the answers to these little things is another way we build confidence in the kitchen and unlock that **perfect cookie texture** time and time again.
Can I make these homemade chocolate chip cookies ahead of time?
Oh yes, you absolutely can! In fact, chilling the dough—even for just 30 minutes—is one of my best “hacks” for achieving **thick and chewy cookies** because it stops them from spreading too fast. If you really want to plan ahead, you can mix the whole batch of dough, cover it tightly, and keep it in the refrigerator for up to three days.
When you’re ready to bake, just pull out the dough balls and let them sit on the counter for maybe 15 or 20 minutes to warm *slightly* before putting them in the 375°F oven. They bake up just as deliciously as if you made them right away. It’s fantastic for having **Classic Chocolate Chip Treats** ready on demand!
What makes these cookies bakery style vs. regular homemade chocolate chip cookies?
That bakery style mostly comes down to two things we talk about a lot: thickness and that wonderful, soft interior. Regular rushed recipes often use melted butter or don’t give enough time to cream the sugar and fat, which results in cookies that spread super thin.
For these **Bakery Style Cookies**, we use softened butter and ensure we properly cream it for volume. More importantly, remember the baking time! We pull these **Ultimate Chocolate Chip Cookies** out when they look *slightly* underdone in the middle. That slightly underbaked state sets up perfectly as they cool, giving you the thick, **soft gooey center cookies** you see in fancy bakeries.
Why do my cookies spread so much?
If your cookies are spreading too much, ninety-nine times out of a hundred, it’s the butter temperature! If the butter is too warm or fully melted, the dough can’t hold its shape in the heat, and they flatten out immediately. That’s why room temperature, *soft* butter is key, and chilling the dough really locks in that shape. Also, make sure your baking powder/soda isn’t expired, because weak leavening can sometimes cause spreading, too!
Can I use melted butter instead of softened butter in this recipe?
I strongly advise against it if you are chasing thick cookies! Melted butter changes the structure of the dough completely. It contributes to spread and results in a denser, sometimes greasy cookie rather than that light, airy crumb you get from creaming. We need the creaming process to whip in that air, which softened butter allows for. Stick to softened for this recipe to guarantee you get those amazing **crispy edge cookies**!
Nutritional Estimates for These Homemade Chocolate Chip Cookies
I always feel a little funny talking about nutrition when cookies are involved, because let’s be honest, these are pure joy, not health food! But I know some of you like to keep track. Based on how I make these **homemade chocolate chip cookies** (using the ingredients listed), one cookie comes out to roughly 180 calories, 10g of fat, and 15g of sugar.
Remember, this is just an estimate! If you use dark chocolate or extra butter, those numbers will adjust. Enjoy them guilt-free—the joy you get from baking them yourself is the best part of the calories!
Share Your Ultimate Chocolate Chip Cookie Creations
Now that you’ve baked the best batch of **homemade chocolate chip cookies**—seriously, they have to be the best now, right?—I want to see them! Nothing makes me happier than knowing one of my recipes brought some joy or comfort to your table. When you pull those beautiful, thick, golden cookies out of the oven, take a picture!
I absolutely love connecting with everyone who stops by Pure Cooking Joy. If you loved these **buttery chocolate chip cookies** and they hit that perfect chewy-crisp mark, please do me a huge favor and leave a quick rating below. Five stars for the **Best Chocolate Chip Cookie Recipe**? I hope so!
And if you shared them on social media, tag me! You can find me over on Facebook where we chat all things cooking, simple techniques, and easy entertaining. I always click through to see your handiwork. It truly means the world to me. If you want to check out more of my favorite easy reads, you can always browse the main recipe index here: More Simple Baking Recipes. Happy baking until next time!
Don’t forget to drop by and say hello on our Facebook page: Pure Cooking Joy on Facebook. Can’t wait to see your delicious results!
PrintThe Ultimate Bakery-Style Homemade Chocolate Chip Cookies: Thick, Soft, and Chewy

I’m Alex, and I want to share my foolproof recipe for the best homemade chocolate chip cookies. These cookies deliver thick, bakery-style results with soft, gooey centers and perfectly crisp edges. This is the classic treat you will want to bake again and again.
- Prep Time: 15 min
- Cook Time: 12 min
- Total Time: 27 min
- Yield: About 2 dozen cookies 1x
- Category: Dessert
- Method: Baking
- Cuisine: American
- Diet: Vegetarian
Ingredients
- 1 cup (2 sticks) unsalted butter, softened
- ¾ cup granulated sugar
- ¾ cup packed light brown sugar
- 2 large eggs
- 1 tablespoon vanilla extract
- 2 ¼ cups all-purpose flour
- 1 teaspoon baking soda
- ½ teaspoon salt
- 1 ½ cups semi-sweet chocolate chips (or a mix of milk and dark)
Instructions
- Preheat your oven to 375°F (190°C). Line baking sheets with parchment paper.
- In a large bowl, cream together the softened butter, granulated sugar, and brown sugar until the mixture is light and fluffy. This takes about 3 minutes with an electric mixer.
- Beat in the eggs one at a time, mixing well after each addition. Stir in the vanilla extract.
- In a separate medium bowl, whisk together the flour, baking soda, and salt.
- Gradually add the dry ingredients to the wet ingredients, mixing on low speed until just combined. Do not overmix the dough.
- Fold in the chocolate chips using a spatula.
- Drop rounded tablespoons of dough onto the prepared baking sheets, spacing them about 2 inches apart. For thicker cookies, slightly mound the dough.
- Bake for 9 to 12 minutes. The edges should be golden brown, but the centers should still look slightly soft and underbaked. This is key for a soft, gooey center.
- Remove the cookies from the oven and let them cool on the baking sheet for 5 minutes before transferring them to a wire rack to cool completely.
Notes
- For the best texture, use room temperature eggs and softened (not melted) butter.
- Chilling the dough for 30 minutes before baking helps prevent spreading, resulting in thicker cookies.
- Use high-quality chocolate chips for superior flavor; consider using chocolate chunks for more melt pockets.
- If you want crispier edges, bake for an extra minute or two, watching closely.
Nutrition
- Serving Size: 1 cookie
- Calories: 180
- Sugar: 15
- Sodium: 120
- Fat: 10
- Saturated Fat: 6
- Unsaturated Fat: 4
- Trans Fat: 0
- Carbohydrates: 23
- Fiber: 1
- Protein: 2
- Cholesterol: 30
