 Skip to content

You know those moments when you need a fantastic appetizer, and you need it *fast*? I’ve been there! After years of being stuck behind a desk, I swore off complicated cooking when I finally found my way back to the kitchen. That’s why I live for recipes that deliver huge flavor without stressing you out. If you need the ultimate crowd-pleasing snack that disappears anytime you bring it out, look no further than these pizza sliders. Seriously, using sweet, tender Hawaiian rolls to create these cheesy, pull-apart sandwiches has changed my game-day prep forever. This recipe proves my whole philosophy here at Pure Cooking Joy, which you can read more about on my story page: incredible food should be approachable, memorable, and taste amazing, no spreadsheets required!
- Why These Garlic Butter Pizza Sliders Are a Crowd Pleasing Appetizer
- Essential Ingredients for Perfect Pizza Sliders
- Step-by-Step Instructions for Baked Pizza Sliders
- Tips for the Best Pepperoni Pizza Sliders Recipe
- Making Pizza Sliders a 30 Minute Dinner Idea
- Creative Variations for Your Pizza Sliders
- Storage and Reheating Instructions for Leftover Pizza Sliders
- Frequently Asked Questions About Pizza Sliders
- Sharing Your Easy Pizza Sliders Experience
- Sharing Your Easy Pizza Sliders Experience
Why These Garlic Butter Pizza Sliders Are a Crowd Pleasing Appetizer
I won’t lie, when I first made these, I was nervous they wouldn’t hold up on the appetizer platter. I was so wrong! These pizza sliders are the definition of a crowd pleasing appetizer. The secret is that magic combination: the inherent sweetness of the Hawaiian rolls plays against the salty pepperoni and savory mozzarella. It’s heavenly!
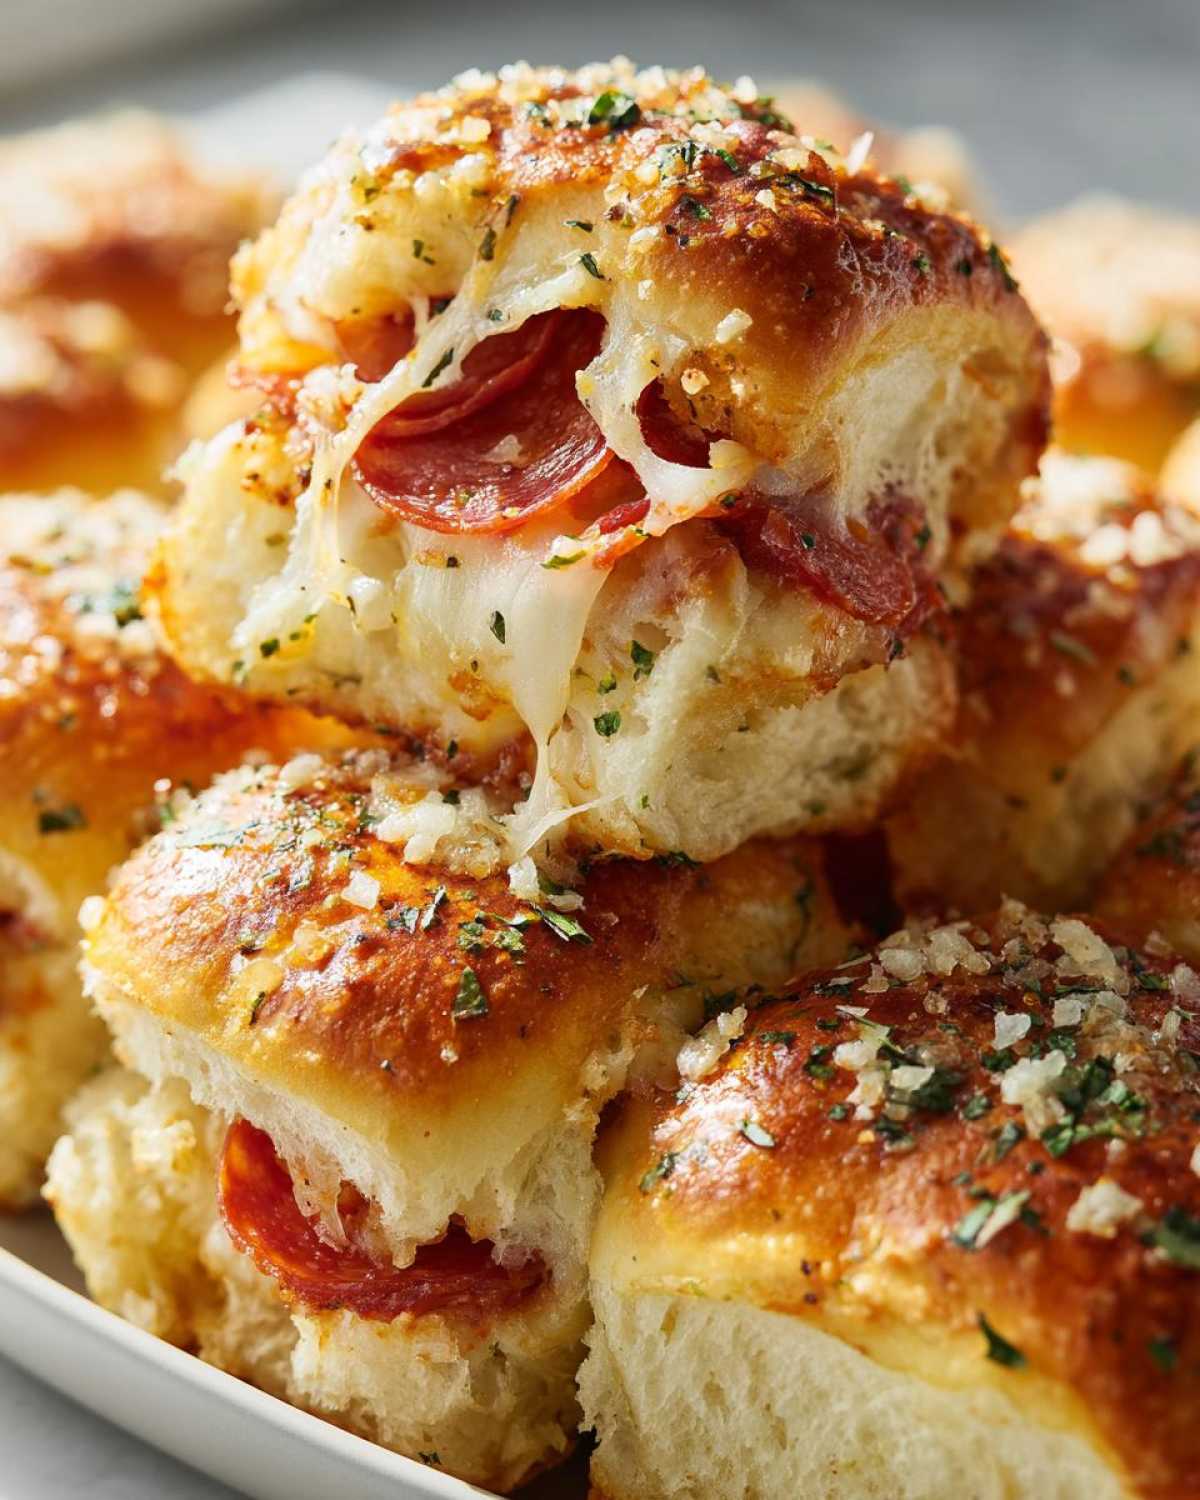
The best part, honestly, is the texture. Because they bake right up in one unit, you get these perfect, cheesy pull apart pizza sandwiches. No fussy plating needed! I made these for a huge Super Bowl party last year, and by half-time, the pan was spotless. It saved me so much time compared to making individual snacks. If you’re hosting or just trying to get dinner on the table fast, these are your heroes. Check out my tips for easy entertaining and other appetizer recipes when you have a minute!
Perfect for Game Day Sliders and Party Prep
These truly shine when you need food ready before things get wild. They are the perfect game day sliders because you assemble the entire dish, wrap it up, and pop it in the fridge for a little while. Seriously, you assemble them up to 24 hours ahead! That means zero stress when the first guest walks in the door. You just brush on the garlic butter and bake them while everyone is distracted by the pre-game chatter. It’s hosting genius, trust me!
Essential Ingredients for Perfect Pizza Sliders
Okay, let’s talk about what makes these pizza sliders sing! Even though they are super simple, using the right stuff makes all the difference between good and OMG. You need the whole package of 12 count Hawaiian sweet rolls—don’t try to make these with plain white buns; those sweet pockets are what balance out the savory filling, it’s key!
For the fillings, you’re going to load up on the basics that make pizza taste like pizza. We need about a pound of thinly sliced pepperoni—the smaller ones curl up nicely when baked, which is perfect! Then, pile on 2 cups of shredded mozzarella cheese. Mozzarella gives you that amazing, gooey stretch when you pull them apart. For the sauce, any good pizza or marinara works, just avoid anything too watery!
Now for the absolute non-negotiable step: the topping that turns these into garlic butter sliders. You just melt down half a cup of good unsalted butter, toss in two cloves of fresh minced garlic (yes, fresh, please!), along with some dried Italian seasoning. Trust me, that herby, buttery drizzle right on top is what seals the deal.

Ingredient Notes and Substitution Tips
Because we’re keeping this recipe approachable, substitutions are easy, but I have a couple of tips for max flavor. If you want extra tang along with that mozzarella stretch, try mixing in about half a cup of Provolone cheese. It melts beautifully and adds a grown-up flavor profile.
When it comes to the sauce, if you like a little kick, grab a spicy marinara instead of the basic pizza sauce. A little heat cuts through the richness of the butter topping perfectly. The ingredient choice really hammers home the texture, too. Stick to good quality mozzarella and thinly sliced pepperoni, and you won’t end up with a soggy mess. It’s all about balancing that sauce with enough cheese!
Step-by-Step Instructions for Baked Pizza Sliders
Okay, ready to see how these amazing pizza sliders come together? It moves SO fast, which is why I always recommend having all your fillings ready to go before you even touch the rolls. This whole assembly takes maybe ten minutes, tops. First, you need to get that oven humming at 350°F (175°C) and have your 9×13 baking dish ready—I always give mine a quick spray of non-stick, just to be totally safe.
The trickiest (but easiest!) part is prepping the rolls. You have two options here, depending on how confident you feel! You can keep them snug inside their plastic packaging and carefully slice the entire block horizontally, or, if they are loose, slice them into a clean top half and a bottom half. Place that entire bottom layer snugly into your prepared pan. Now layer on your sauce, spread that pepperoni out evenly, and then hit it HARD with the mozzarella.
Now, place your top half of the rolls right over that lovely layer of cheese. You are officially ready to make these fantastic baked slider recipes shine! Remember, the beauty of this is that you’re creating one massive, delicious sandwich that we’ll pull apart later. If you love garlic butter on your Hawaiian rolls, you have to check out my recipe for garlic bread—it uses a similar concept!
Creating the Signature Garlic Butter Sliders Topping
This is where the flavor gets dialed up to eleven! In a small bowl—the smaller the bowl, the less wiping up you have to do later, trust me—mix your melted butter, that fresh minced garlic, and your Italian seasoning. Stir it up until it smells incredible.
Take a pastry brush—make sure it’s clean—and gently brush this glorious mixture all over the top of those rolls. You want full coverage! Don’t be shy; every little nook and cranny needs some of that garlic butter goodness. Afterward, you’ll sprinkle that grated Parmesan right on top of the butter. This melts down and creates the crispiest, most flavorful crust for your garlic butter sliders.
Baking Technique for Cheesy Pizza Bites Perfection
For the baking part, we need to protect our beautiful topping from scorching before the cheese melts all gooey inside. Cover the whole dish loosely with aluminum foil. You don’t want it tight! Bake it like that for about 15 minutes. This steams everything gently and gets the insides hot.
Next, pull that foil off—watch out for the steam—and bake it uncovered for another 5 to 10 minutes. This second phase is crucial for getting those golden-brown tops that really define these as perfect cheesy pizza bites. Once the cheese is bubbling and the tops are toasty, pull them out. Let them rest on the counter for a full five minutes. This resting time lets the cheese settle just a hair so when you finally slice between the rolls, everything stays together better!
Tips for the Best Pepperoni Pizza Sliders Recipe
I want your Pepperoni Pizza Sliders Recipe attempt to be absolutely perfect, so let me share a couple of my secrets for avoiding common slider pitfalls. The biggest issue people run into? That soggy bottom layer! Because we are working with wet sauce, you have to be smart about distribution.
My best advice for keeping things dry is to manage the sauce—don’t slather it on like you would a full pizza. Use just enough to lightly coat the bottom half of those sweet rolls. Even better, if you have time, sometimes I’ll lightly toast the bottom halves in the oven for about three minutes *before* I start layering. It’s a little extra step, but it creates a little barrier against the moisture. That makes all the difference!

Also, think about your cheese distribution. You want about half your mozzarella on the bottom layer, then the pepperoni, and then the rest of the cheese on top of that. This traps the pepperoni flavor but ensures a fantastic, gooey melt right before the top layer gets the garlic butter treatment. For more tips for building confidence in the kitchen, take a peek at my blog archives!
Making Pizza Sliders a 30 Minute Dinner Idea
When that 5:30 PM panic hits, the last thing I want to do is spend an hour assembling a meal or waiting for delivery. That’s why these pizza sliders are my secret weapon for a super fast weeknight meal, making them the ultimate 30 minute dinner idea. Seriously, the prep time is barely ten minutes because everything is already layered and waiting to be assembled in that baking dish!
You bake them for about 25 minutes, and bam—hot, cheesy, totally satisfying pizza is ready. This is so much faster and frankly, way more fun than waiting on delivery drivers, especially when you have hungry kids staring at the clock. You get that classic pizza flavor straight from the oven without any of the fuss. If you need more fast options like this, you should check out my section on effortless weeknight dinners for more ideas!
Creative Variations for Your Pizza Sliders
The basic pepperoni and cheese version of these pizza sliders is perfect, but you know me—I love to experiment! Once you master the bread, the filling, and that amazing garlic butter top, you can really start having fun. These rolls are so forgiving, which makes getting creative super easy. If you’re looking to jazz things up for your next gathering and try out some of the best slider variations, I have a few tried-and-true favorites that the family adores.
My first go-to when I’m trying to use up odds and ends in the fridge is the “Supreme” style. Instead of just pepperoni, I chop up some cooked sausage, thinly sliced mushrooms, and maybe a few slivers of green bell pepper. Make sure those veggies are sliced paper-thin so they don’t release too much water during baking! Just sprinkle them lightly over the mozzarella before you add the top half of the rolls.
Another winner, especially for folks who aren’t into red sauce, is switching it up entirely. Try a ham and cheese version! Use sliced deli ham instead of pepperoni, and swap the pizza sauce for a very thin layer of yellow mustard mixed with a tiny bit of mayonnaise for creaminess. That combination, topped with Swiss cheese instead of mozzarella, is surprisingly fantastic. Remember, these are your mini pizza sandwiches, so feel free to play around with fillings!
If you need a vegetarian option that isn’t boring, go for a Pesto Veggie slider. Skip the marinara entirely and spread a thin layer of basil pesto on the bottom rolls. Top that with mozzarella, thinly sliced zucchini, and maybe some sun-dried tomatoes. That buttery Parmesan topping works just as well over pesto, I promise you! It’s amazing how versatile these simple pull apart pizza sandwiches can be.
Storage and Reheating Instructions for Leftover Pizza Sliders
These pizza sliders are honestly best eaten straight out of the oven, warm, gloppy, and cheesy—you know the drill! But let’s be real, they’re so good sometimes we don’t finish the whole pan. Good news: they make for an incredible leftover lunch the next day, turning into a super easy and comforting family friendly pizza meal.
When you have leftovers, you need to store them correctly to keep the rolls from getting weird and soggy overnight. Let the sliders cool down completely first—this stops condensation in the storage container which equals mushy bread. Once cool, place them into a good airtight container. Don’t just shove them in foil; an airtight seal is what keeps them tasting fresh. You can keep these safely in the fridge for up to three days.
Reheating is where you need a little patience, but trust me, it’s worth skipping the microwave! Microwaving these sweet rolls makes them chewy and tough, and you lose all that lovely crispy garlic butter crust. For the best texture, wrap the amount you want to eat in a small piece of aluminum foil—just enough to cover them—and pop them into a toaster oven or a regular oven preheated to about 325°F (160°C).

Let them bake wrapped for about 8 to 10 minutes. This steams them gently, melting the cheese again without drying out the bread. If you like them a little crispy on top, pull the foil off for the last minute or two. They come out tasting almost as good as fresh, flaky on the outside and gooey on the inside. It’s a lifesaver when you need a quick bite!
Frequently Asked Questions About Pizza Sliders
When you’re making a recipe for the first time, especially one meant for a big crowd, you usually have a few little burning questions, right? That was me too! I jumped straight into the oven before figuring out the minor details. I’m putting the most common things I hear about these pizza sliders right here so you feel totally confident before you start assembling. If you still have questions, don’t hesitate to reach out to me on my contact page!
What is the best way to prevent soggy bottoms on these pizza sliders?
Ah, the dreaded soggy bottom! This is the number one challenge when you’re layering sauce onto soft bread, but it’s totally manageable. My absolute favorite move for these mini pizza sandwiches is to pre-toast the bottom layer. When you slice the rolls in half, spread the bottom layer out on a clean baking sheet for just about three minutes in the 350°F oven. You just want them firming up a tiny bit—no browning needed!
If you’re short on time and can’t pre-toast, the next best thing is being really conservative with the pizza sauce. Remember, you don’t need a coating that’s half an inch thick; you just need enough to flavor the bread and glue the pepperoni down. A light, even layer is always better than a heavy, wet one when you bake them all together!
Can I use regular dinner rolls instead of Hawaiian rolls for these pizza sliders?
You absolutely *can* substitute them if that’s all you have on hand, but you’re going to lose what makes this recipe truly special. I love classic rolls, but for these pizza sliders, the Hawaiian rolls are non-negotiable for the best flavor balance. Why? Because the savory pizza toppings—the salty pepperoni, the tangy sauce, the rich mozzarella—need a counterpoint.
The slight sweetness of the Hawaiian rolls cuts through the richness of all that cheese and garlic butter like nothing else. It’s what makes them so addictively good! If you use a plain, unsweetened roll, the final product just tastes like a regular pizza sandwich, and we are aiming for that next-level *pop* of flavor here. I really encourage you to try at least one batch with the sweet rolls first; you’ll see exactly what I mean!
What cheese melts the best for these pull-apart sandwiches?
Hands down, full-fat, low-moisture shredded mozzarella is the king here. It gives you that beautiful, long, stringy pull when you bite into your pull apart pizza sandwich. But don’t stop there! I typically do about 75% mozzarella and 25% Provolone. The Provolone adds a fantastic, slightly sharper flavor that dairy-heavy mozzarella sometimes lacks.
Avoid pre-shredded cheese if you can, because that anti-caking agent sometimes interferes with the ultimate gooey melt. If you grate your own mozzarella, you’ll notice a huge difference in how smoothly everything blends together after baking. A mix of Mozzarella, Provolone, and maybe just a tiny dusting of Parmesan on top (which we already add with the butter!) creates the ultimate cheese blanket.
Is it really possible to make these as a make-ahead appetizer?
Yes! This is one of my absolute favorite features, especially when planning for those huge Super Bowl food ideas events. You can assemble the entire thing—sauce, meat, cheese—onto the bottom buns, put the top buns on, and brush heavily with the garlic butter. Once it’s all assembled, cover the dish tightly with plastic wrap and stick it in the fridge.
I suggest assembling them no more than 24 hours ahead of time for the best results. When you’re ready to bake, pull it out while the oven preheats. You might need to add about 5 to 7 extra minutes to the initial covered bake time since the ingredients are coming from the cold fridge. It’s a real sanity saver for any host!
Sharing Your Easy Pizza Sliders Experience
I truly hope you love making these Easy Pizza Sliders as much as I love eating them! They have become a staple in my house any time we have folks over, whether it’s for a casual Friday night or a big party. Remember, the joy in cooking comes from sharing what you create, so if you try this recipe, please let me know how it goes!
When you do make these, snap a picture! I would love to see your perfectly golden, cheesy creations. You can tag me on Facebook; I’m always over there chatting with fellow home cooks and sharing behind-the-scenes kitchen moments, especially during football season. If these cheesy bites earned a solid five stars in your house, leave me a rating right here on the page. Happy cooking, and thanks for stopping by Pure Cooking Joy!
Sharing Your Easy Pizza Sliders Experience
I truly hope you love making these Easy Pizza Sliders as much as I love eating them! They have become a staple in my house any time we have folks over, whether it’s for a casual Friday night or a big party. Remember, the joy in cooking comes from sharing what you create, so if you try this recipe, please let me know how it goes!
When you do make these, snap a picture! I would love to see your perfectly golden, cheesy creations. You can tag me on Facebook; I’m always over there chatting with fellow home cooks and sharing behind-the-scenes kitchen moments, especially during football season. If these cheesy bites earned a solid five stars in your house, leave me a rating right here on the page. Happy cooking, and thanks for stopping by Pure Cooking Joy! Feel free to connect with me directly over on my official page at Facebook!
PrintEasy Garlic Butter Pizza Sliders on Hawaiian Rolls

Make these quick, cheesy pizza sliders using Hawaiian rolls. They are baked together for a pull-apart appetizer perfect for game days or simple family dinners.
- Prep Time: 10 min
- Cook Time: 25 min
- Total Time: 35 min
- Yield: 12 sliders 1x
- Category: Appetizer
- Method: Baking
- Cuisine: American
- Diet: Vegetarian
Ingredients
- 1 package (12 count) Hawaiian sweet rolls
- 1 cup pizza or marinara sauce
- 1 pound thinly sliced pepperoni
- 2 cups shredded mozzarella cheese
- 1/2 cup unsalted butter, melted
- 2 cloves garlic, minced
- 1 teaspoon dried Italian seasoning
- 1/4 cup grated Parmesan cheese
Instructions
- Preheat your oven to 350°F (175°C). Lightly grease a 9×13 inch baking dish.
- Keep the Hawaiian rolls connected in their original package or slice the entire block of rolls horizontally, creating a top half and a bottom half. Place the bottom half of the rolls into the prepared baking dish.
- Spread the pizza sauce evenly over the bottom layer of rolls.
- Layer the pepperoni slices over the sauce.
- Sprinkle the mozzarella cheese evenly over the pepperoni layer.
- Place the top half of the rolls over the cheese layer.
- In a small bowl, combine the melted butter, minced garlic, and Italian seasoning. Mix well.
- Brush the garlic butter mixture evenly over the top of the assembled sliders.
- Sprinkle the grated Parmesan cheese over the buttered tops.
- Cover the baking dish loosely with aluminum foil. Bake for 15 minutes.
- Remove the foil and bake for another 5 to 10 minutes, or until the cheese is fully melted and the tops are lightly golden brown.
- Let the sliders rest for 5 minutes before slicing between the rolls and serving warm.
Notes
- For crispier pepperoni, you can briefly cook it in a skillet before assembling the sliders.
- If you want to try variations, add thin slices of cooked sausage or ham, or a sprinkle of dried oregano with the Parmesan.
- These sliders are great for meal planning; you can assemble them completely, cover, and refrigerate for up to 24 hours before baking.
Nutrition
- Serving Size: 1 slider
- Calories: 320
- Sugar: 8
- Sodium: 750
- Fat: 16
- Saturated Fat: 7
- Unsaturated Fat: 9
- Trans Fat: 0.5
- Carbohydrates: 30
- Fiber: 1
- Protein: 15
- Cholesterol: 40
