 Skip to content

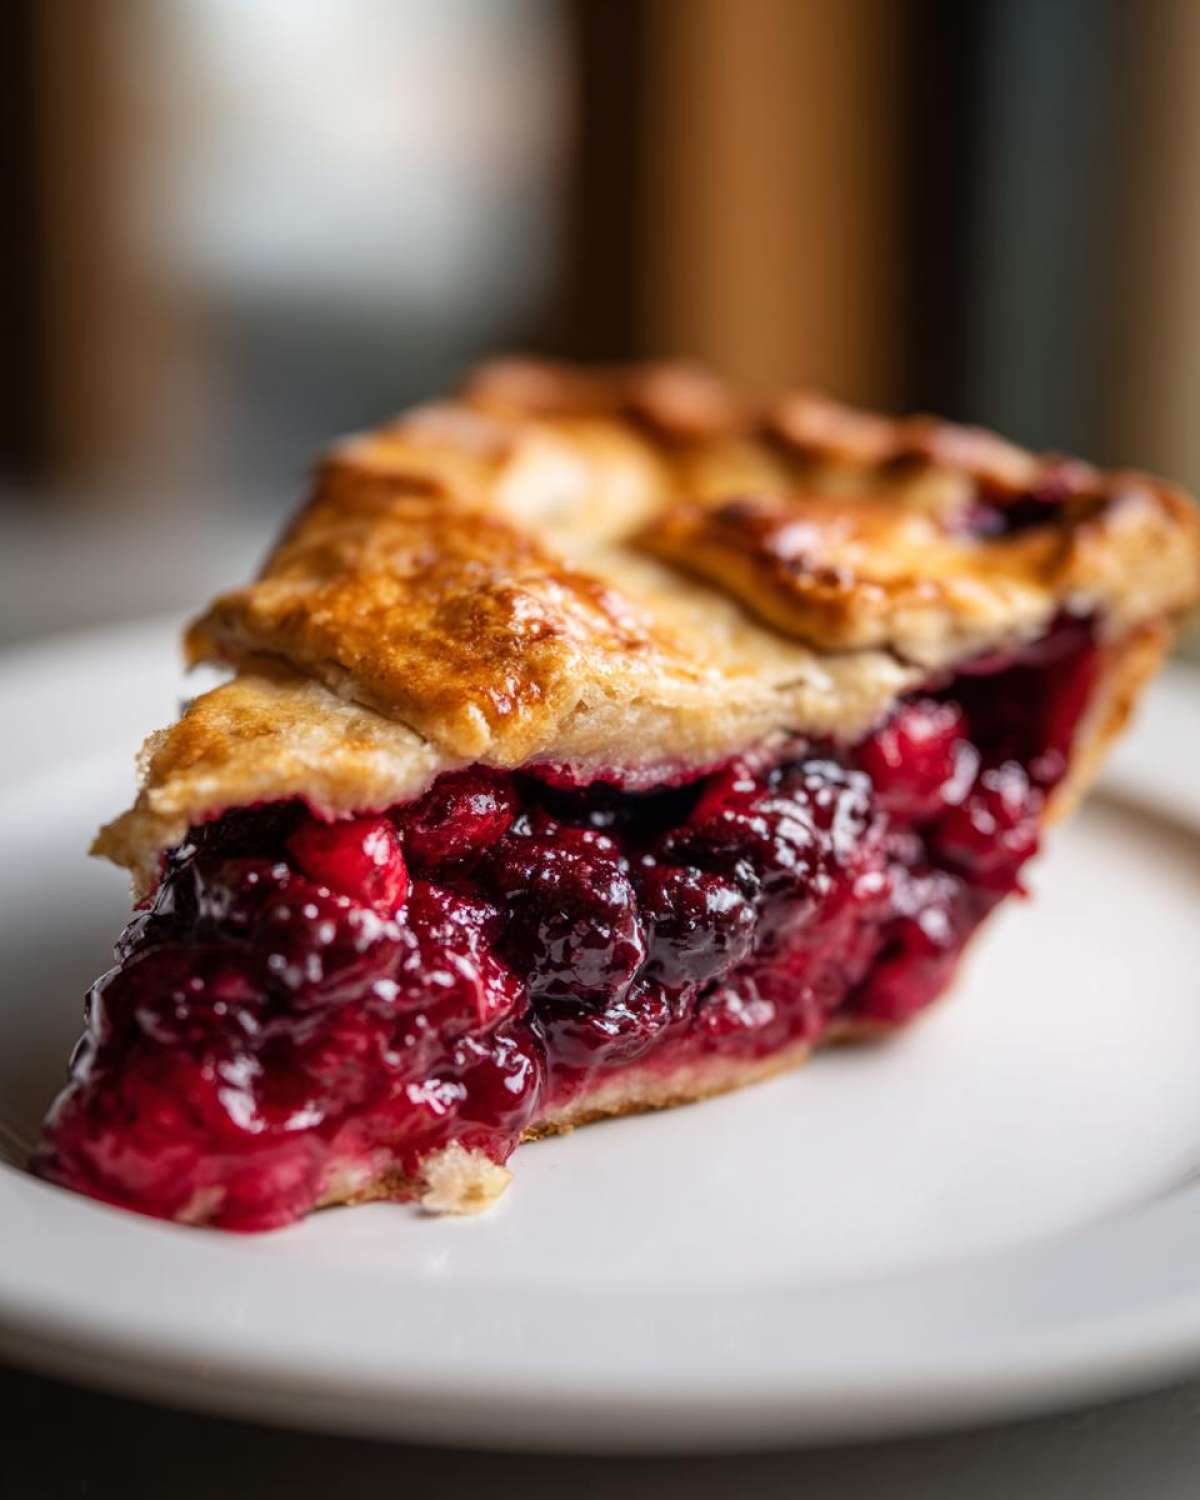
If there’s one dessert that instantly whispers “comfort” to my soul, it’s a homemade pie, still warm from the oven. I used to think making a truly spectacular berry pie was reserved for professional bakers, but I was totally wrong! That’s why I’m so excited to share what I truly believe is The Ultimate Mixed Berry Pie with Flaky All-Butter Crust. This isn’t some complicated bakery trick—this is soul-satisfying food made approachable. We nail two big things here: that incredible, laminated, buttery crust, and a filling that actually sets up perfectly, meaning absolutely no soupy slices!
This recipe is my go-to example of our philosophy here at Pure Cooking Joy. We take a classic, something everyone loves, like a perfect berry pie, and we make sure the steps are clear enough for anyone in any kitchen to master. When you pull this beauty out, smelling the sweet-tart fruit aroma and seeing that golden shield of pastry, you’ll feel that sense of pure accomplishment I only discovered years after leaving my corporate burnout behind. It’s about finding joy in the simple, delicious rewards of cooking. Trust me, this mixed berry pie will be your new favorite comfort food favorite, too.
- Why This Mixed Berry Pie Recipe Delivers Pure Cooking Joy
- Ingredients for the Ultimate Berry Pie with Flaky Crust
- Step-by-Step Instructions for Your Homemade Berry Pie
- Tips for the Best Berry Pie Success
- Making Ahead and Storing Your Delicious Homemade Dessert
- Berry Pie Variations and Serving Suggestions
- Frequently Asked Questions About Making a Perfect Berry Pie
- Estimated Nutritional Data for This Berry Pie
- Share Your Homemade Berry Pie Creations
Why This Mixed Berry Pie Recipe Delivers Pure Cooking Joy
I know you’ve been burned before by a runny filling or a tough crust. We’ve all been there! But that’s exactly why I spent so much time refining this recipe. When you master this classic berry pie, you’re setting yourself up for success every single time you bake. This isn’t just a recipe; it’s a promise of reliability and pure flavor. Here is what makes this mixed berry pie recipe special:
- It uses an all-butter crust that shatters perfectly when you slice it.
- The filling is thick, juicy, and sweet-tart—never soupy or dull.
- It works flawlessly whether your market has the best summer fruit or you’re using frozen berries in December.
Achieving the Perfect Flaky All-Butter Crust
That rich, buttery crumb is non-negotiable for me! This flaky pie crust recipe gets its texture purely from keeping everything ice cold—the butter, the water, even the bowl if I can manage it. When those little frozen chunks of butter hit the hot oven, they steam, forcing the dough layers apart. The result? A golden brown, delicate shell that smells heavenly. This is the foundation of a great dessert, so don’t rush this part!
The Secret to a No Runny Pie Filling in Your Berry Pie
Seriously folks, this is where we eliminate the dreaded mess. Our secret weapon isn’t exotic; it’s standard cornstarch, and we use just the right amount to thicken all those lovely berry juices. It creates an almost jammy consistency that stays put when you cut into your berry pie. The sweet and tart notes from the sugar and lemon balance the fruit so beautifully; it’s just the right combination of bright and comforting.

Ingredients for the Ultimate Berry Pie with Flaky Crust
Okay, time to get organized! The key to nailing this classic mixed berry pie recipe is making sure your ingredients are prepped exactly as listed. Precision matters way more here than in a lot of other baking, especially when we are aiming for that perfect, buttery crust dessert experience. Remember, the better the berries you start with, the more vibrant your pie filling will taste. If you get a chance to use peak-season fresh fruit, go for it! But don’t stress, frozen works just fine too, as we cover later.
For the Flaky All-Butter Pie Crust
This is the foundation, so listen up on the temperature! Everything here must be painfully cold. If your butter melts even slightly before it hits the oven, you’ve lost the flakiness we are chasing. Do not substitute the butter unless you absolutely must; the flavor just isn’t the same.
- 2 1/2 cups all-purpose flour
- 1 teaspoon salt
- 1 cup (2 sticks) unsalted butter, very cold and cubed—and I mean *really* cold!
- 1/2 cup ice water (plus 1-2 tablespoons more if needed)
For the Sweet and Tart Berry Pie Filling
This is where we lock in that sweet and tart punch. I put a little extra attention on the cornstarch measurement here because it’s the guardrail keeping your filling firm and preventing that heartbreaking soupy texture. If you want that perfect slice, measure this thickening agent carefully!
- 6 cups mixed berries (strawberries, blueberries, raspberries, blackberries—whatever looks best!)
- 3/4 cup granulated sugar (taste your berries first, you might go up or down a touch!)
- 1/4 cup cornstarch (This is the magic trick for a no runny pie filling trick!)
- 1 tablespoon lemon juice
- 1 teaspoon vanilla extract
- 1 large egg, beaten with 1 teaspoon water (for the egg wash)
- 1 tablespoon coarse sugar (for sprinkling)
Step-by-Step Instructions for Your Homemade Berry Pie
Alright, let’s get down to the fun part! We’ve got our cold ingredients ready, and now it’s time to bring this beautiful make ahead pie to life. Follow these steps exactly, especially with the crust, and I promise you’ll get that incredible reward—a structurally sound, flavorful pie that doesn’t leak all over your oven. This is about building confidence, one pastry layer at a time!
Making and Chilling the Flaky Pie Crust Recipe
This is where our buttery crust dessert gets its magic. In a big bowl, grab your flour and salt, and then toss in those super cold, cubed chunks of butter. You need to work fast here! Use a pastry blender or just your fingertips to cut that butter in. Stop when it looks like coarse meal, but make sure you still see some visible, pea-sized pieces of butter floating around—those are your steam pockets! Now, drizzle in the ice water, just a splash at a time. Mix it until the dough barely holds together when you squeeze a handful. Divide it, wrap those disks tight, and get them into the fridge. They must chill for at least one hour. Resist cutting into that dough early; chilling is essential for a sturdy structure!
Mixing the Best Berry Pie Filling
While the dough is chilling and getting nice and cold, we’ll handle the fruit. Take your mixed berries—whether they are glistening fresh off the vine or coming straight from the freezer (don’t thaw those frozen ones!)—and put them in a separate bowl. Now, gently sprinkle over the sugar, the all-important cornstarch, the lemon juice, and vanilla. You need to toss this mixture super gently. If you mash the berries now, you’ll end up with sad, broken fruit in your final slice. We want whole or mostly whole fruit suspended in that thick, vibrant juice. Set this aside while you get your first dough disk ready. This gentle method ensures you get that perfect berry pie filling consistency.
Assembling and Topping Your Berry Pie
Time to roll! Lightly flour your counter and roll out one chilled disk into about a 12-inch circle. Carefully drape that over your 9-inch pie plate. Don’t stretch it! Trim the edges so you have about an inch hanging over the rim. Pop that plate back in the fridge—cold dough is happy dough. Now, pour in all that gorgeous berry filling. For the top, you have two choices! You can roll out the second disk and gently place it over the top, cutting a few slits so steam can escape—or, if you’re feeling fancy, cut it into strips to weave yourself a beautiful lattice pie top. Once topped, trim the edges again, fold the top overhang under the bottom edge, and crimp them together—I just love using my thumb and forefinger to create those pretty scallops.

Baking and Cooling for Perfect Results
Before it hits the heat, brush the entire top surface with your egg wash (the egg mixed with a tiny bit of water) and dust it generously with that coarse sugar for crunch. Stick the whole thing in the fridge for a final 20-minute chill! This helps fight shrinkage. Preheat your oven to a hot 400°F (200°C). Place the pie on a baking sheet—trust me on this drip-catcher! Bake it hard for 20 minutes at that higher temp. Then, you must reduce the heat down to 375°F (190°C) and keep baking for another 35 to 45 minutes. If the edges look too dark halfway through, just loosely tent some foil over them. Most importantly: after you pull it out (when the filling is thickly bubbling!), let it cool completely, for at least four long hours. This waiting is the final step for that no runny pie filling trick. Be patient; it’s worth it!
Tips for the Best Berry Pie Success
Even though this recipe is designed to be foolproof—because that’s my promise to you here at Pure Cooking Joy—sometimes things still need a little nudge in the right direction. Baking is chemistry, but it’s also about knowing your oven and your ingredients! I’ve gathered a few extra pointers that have helped me achieve that truly spectacular berry pie time and time again. These little tweaks separate a good pie from one that has people asking for the recipe!
Handling Frozen Berries in Your Berry Pie
I love using frozen berries, especially when fresh ones are out of season. It means we can enjoy this classic fruit dessert all year long! The absolute key when using frozen is *do not thaw them first*. If you thaw them, they release all their moisture onto your counter, and that moisture is what causes sinking and runniness. Toss those icy berries straight into the dry mixture with the cornstarch and sugar. You might need to add about 5 to 10 extra minutes to your second baking stage since the fruit starts colder, but keeping them solid until they hit the oven is crucial for structure.
Preventing a Soggy Bottom Crust
Ugh, the dreaded soggy bottom! It’s the arch-nemesis of every fruit pie maker, but we can fight it! First, make sure you’re chilling that assembled pie before it goes into the oven. That 20-minute rest helps seal the bottom crust against the cold pie pan. Also, ditch the aluminum pans if you can; I find that a clear glass or a sturdy metal pie plate helps the bottom crust cook through properly. My favorite non-negotiable trick is baking the pie on a preheated baking sheet. Pop that empty sheet in the oven while it preheats, and when you put the pie in, set it right on that hot surface. The immediate heat transfer helps set the bottom dough quickly, ensuring you get that lovely, flaky layer right up until the last bite of your buttery crust dessert.
Making Ahead and Storing Your Delicious Homemade Dessert
When you’re making something this good, you inevitably want to know if you can save some for later or if you have to eat it all immediately (tempting, I know!). The great news is that this mixed berry pie is fantastic for planning ahead. It’s what I call an easy entertaining hero because I can do most of the heavy lifting before company even arrives. It’s such a satisfying feeling to know that this make ahead pie is tucked away waiting for dessert time!
Chilling Unbaked Pies for Later
This crust holds up beautifully to a chill! If you want to prep the entire pie—bottom crust, filling, and top crust—you can absolutely do that. Assemble the pie completely, brush it with the egg wash, and sprinkle the coarse sugar on top just like the instructions say. Then, wrap the whole thing tightly in plastic wrap. You can store this unbaked pie in the refrigerator for up to 2 days. If you bake it straight from the fridge, just add about 10 minutes to the total baking time. That’s perfect for keeping stress low before a big dinner party!
Storing Your Perfectly Baked Berry Pie
Once that beautiful pie has cooled completely (remember, at least four hours!), it’s ready for storage. Because we used cornstarch to thicken the filling, this easy fruit pie is stable at room temperature for about a day, covered loosely. If you have leftovers past that, or if your kitchen is super warm, cover the pie plate tightly with foil and tuck it into the fridge. It keeps super well for up to four days! When you’re ready to serve a piece, I prefer letting it sit on the counter for about 30 minutes to take the chill off, but you can eat it cold too. It just won’t have that same fresh-from-the-oven texture, but the flavor is still amazing!
Berry Pie Variations and Serving Suggestions
Part of the joy I found when I moved away from my corporate life and into the kitchen was realizing that recipes are just fantastic starting points! This Ultimate Mixed Berry Pie is designed to be adaptable. It’s your canvas for an amazing summer berry dessert, and you shouldn’t feel beholden to just the lattice top if you aren’t feeling it. Get creative! This is your kitchen, after all.
Switching Up the Topping: Crumble vs. Crust
If you’re short on time, or if you just really, really love buttery crunch over flaky pastry, you can completely skip the top crust. Instead, use a simple berry crumble topping. Just mix 1 cup of flour, 1/2 cup of packed brown sugar, 1/4 cup of granulated sugar, a pinch of cinnamon, and 1/2 cup of cold, cubed butter until you have a coarse, crumbly mix. Gently scatter this over the filling instead of the second dough disc. It bakes up golden and delicious, offering a completely different but equally satisfying texture! It makes this recipe even more of an easy pie recipe.
Flavor Boosts for Your Filling
While I love the clean, pure flavor of just berries, vanilla, and lemon, adding a little something extra can really elevate this. If you’re using a darker mix, like blackberries and blueberries, try adding half a teaspoon of ground cardamom or even a tiny pinch of black pepper. It sounds weird, I know! But the pepper brings out the fruitiness in a fantastic way. Also, if you like a deeper caramel note in your homemade berry pie, substitute up to half of your granulated sugar with dark brown sugar. Just remember, brown sugar adds moisture, so make absolutely sure your cornstarch is measured perfectly to keep that filling firm.
Serving Suggestions for a Crowd
This classic fruit dessert demands simple, high-quality accompaniments. When I serve this pie, especially in the summer, I keep it rustic and flavorful. Forget fancy sauces; just grab a high-quality vanilla bean ice cream. The contrast between the warm, spiced fruit and the cold, creamy vanilla is unbeatable. If you want to get really fancy, give a dollop of fresh, barely sweetened whipped cream a try—the texture contrast is wonderful against that flaky crust. And honestly? A slice of this pie with a strong cup of coffee the morning after is the best breakfast you can have!

Frequently Asked Questions About Making a Perfect Berry Pie
I get so many wonderful questions after folks try making this mixed berry pie recipe! It gives me such joy that people are embracing making their own comfort food. Here are some of the most common things I hear about achieving that perfect, sliceable homemade berry pie, whether you’re making a triple berry pie or something else entirely.
Can I use only one type of berry instead of a mix?
Absolutely! This recipe is so forgiving. If you only have blueberries or only have raspberries, go for it! Just make sure you adjust your sugar slightly based on the natural sweetness of the single berry. Also, if you are using thawed fruit other than the main mix, you might need an extra half tablespoon of cornstarch to ensure you still get that no runny pie filling trick to work its magic. But yes, a straight single-berry pie is delicious too!
What if my berry pie filling is STILL runny after it cools completely?
Oh, that’s the worst moment! If, after waiting the full four hours of cooling time, your slice still looks a little watery, don’t panic or throw it away. The easiest fix is to scoop out the top layer of fruit, mix about one teaspoon of cornstarch into a splash of cold water to make a slurry, and then gently pour this mixture over the exposed filling. Put the pie back into a 375°F oven for about 10 minutes just to boil that slurry. It will thicken up right there in the oven. Trust me, it fixes everything!
Do I need to use an egg wash on the top crust?
You don’t *have* to, but I strongly encourage it if you want that beautiful, shiny, golden finish on your flaky pie crust recipe. The egg wash mixed with water creates steam that helps the crust become glossy and also helps that coarse sugar magically stick to the top, giving you that extra little crunch. If you skip it, the crust will still be flaky and delicious, but it will look much more matte. You can see me mixing mine up in the main instructions, and I always make sure to brush it right up to the crimped edge!
Is this recipe suitable for a holiday gathering?
It’s perfect! This is my go-to classic fruit dessert for Thanksgiving and Christmas because it holds up so well, and you can make it ahead. As I mentioned earlier, you can assemble the entire pie a day or two in advance and keep it chilled in the fridge. That way, all you have to worry about on the day of your gathering is putting it in the oven! It’s a fantastic way to reduce stress and still serve a memorable, [meal planning] quality dessert without subscribing to a [meal planning] service!
Have you tried this? I’d love to hear what you thought! If you make it, snap a picture and send one over on my Facebook page at facebook.com/purecookingjoy, or just shoot me a message via my contact page. Happy baking!
Estimated Nutritional Data for This Berry Pie
When I share a recipe like this Ultimate Mixed Berry Pie, people often ask about the nutrition, which is totally fair! We’re talking about a rich, buttery crust combined with fresh fruit, so it definitely falls into the “delicious, soul-satisfying indulgence” category—which is perfectly fine in my book! I want to be totally transparent with you folks about what goes into a slice of this homemade berry pie.
Please remember that these numbers are just estimates. I pull them together based on the standard ingredients I use, but if you use fancy European butter or slightly more sugar, things will shift. Think of this as a helpful guide rather than a strict guarantee for your personalized loaf! If you’re looking to lighten things up while keeping the flavor high, you really should look into some dedicated [meal planning] strategies to balance out the treats!
- Serving Size: 1 slice
- Calories: Approximately 450
- Fat: Approximately 25g (with 15g of that coming from our incredible, cold butter!)
- Carbohydrates: Approximately 55g
- Sugar: Approximately 35g (Remember, a lot of this comes naturally from the mixed berries themselves!)
- Protein: Approximately 5g
See? It’s rich, but fruit-forward! Enjoying food that’s made with love and quality ingredients, like this mixed berry pie recipe, is what life is all about. Don’t let tracking keep you from baking something wonderful and sharing it with the people you care about. That connection—that’s the real reward!
Share Your Homemade Berry Pie Creations
And there you have it—The Ultimate Mixed Berry Pie! Honestly, pulling a beautiful, golden berry pie out of the oven and knowing you made that flaky, buttery crust totally from scratch gives you such a lift, doesn’t it? That feeling, that pure joy, is exactly why I started Pure Cooking Joy. Food is meant to be shared, and creating something delicious brings people together around the table!
Now that you’ve baked your masterpiece, I absolutely insist you come back and tell me all about it! Did the **flaky pie crust recipe** hold up? Did you decide on a full top crust or did you brave the **lattice pie top**? Leave a comment right below this section, or better yet, take a picture of your gorgeous **delicious homemade dessert** slicing perfectly and tag me on social media! I love celebrating your wins.
If you found this recipe helped you conquer your fear of baking or just added a simple, amazing treat to your rotation, I truly hope you’ll stick around. You can read about my transparent approach to ingredients and policies over at the disclosure policy page. Keep cooking with confidence, sharing generously, and finding that peace in your own kitchen. Happy baking, friends!
PrintThe Ultimate Mixed Berry Pie with Flaky All-Butter Crust

Make this classic mixed berry pie using fresh or frozen berries. This recipe features a rich, flaky all-butter crust and a sweet-tart filling guaranteed not to be runny.
- Prep Time: 45 min
- Cook Time: 65 min
- Total Time: 110 min
- Yield: 8 servings 1x
- Category: Dessert
- Method: Baking
- Cuisine: American
- Diet: Vegetarian
Ingredients
- 2 1/2 cups all-purpose flour
- 1 teaspoon salt
- 1 cup (2 sticks) unsalted butter, very cold and cubed
- 1/2 cup ice water (plus 1–2 tablespoons more if needed)
- 6 cups mixed berries (strawberries, blueberries, raspberries, blackberries)
- 3/4 cup granulated sugar (adjust based on berry sweetness)
- 1/4 cup cornstarch (for thickening)
- 1 tablespoon lemon juice
- 1 teaspoon vanilla extract
- 1 large egg, beaten with 1 teaspoon water (for egg wash)
- 1 tablespoon coarse sugar (for sprinkling)
Instructions
- Prepare the Pie Crust: In a large bowl, whisk together the flour and salt. Cut in the cold butter using a pastry blender or your fingers until the mixture resembles coarse crumbs with some pea-sized pieces of butter remaining. Gradually add the ice water, one tablespoon at a time, mixing until the dough just comes together. Do not overmix. Divide the dough in half, form each half into a disk, wrap in plastic, and chill for at least 1 hour.
- Prepare the Filling: In a separate bowl, gently combine the mixed berries, granulated sugar, cornstarch, lemon juice, and vanilla extract. The cornstarch is key to preventing a runny filling. Toss gently to coat the berries evenly. Set aside while you roll out the bottom crust.
- Assemble the Bottom Crust: On a lightly floured surface, roll out one disk of dough into a 12-inch circle. Carefully transfer the dough to a 9-inch pie plate. Trim the edges, leaving a 1-inch overhang. Place the pie plate in the refrigerator while you prepare the top crust.
- Fill the Pie: Pour the berry mixture into the chilled bottom crust. Distribute the berries evenly.
- Create the Top Crust: Roll out the second disk of dough. You can either cut vents in the center for a full top crust or cut the dough into strips for a lattice top. If making a lattice, weave the strips over the filling.
- Seal and Crimp: Trim the top crust overhang to match the bottom. Fold the top edge under the bottom edge and crimp the edges decoratively using your fingers or a fork.
- Chill and Bake: Brush the top crust with the egg wash and sprinkle with coarse sugar. Chill the assembled pie in the refrigerator for 20 minutes before baking. Preheat your oven to 400°F (200°C).
- Bake: Place the pie on a baking sheet (to catch drips). Bake at 400°F (200°C) for 20 minutes. Reduce the oven temperature to 375°F (190°C) and continue baking for another 35 to 45 minutes, or until the crust is golden brown and the filling is bubbling thickly. If the edges brown too quickly, cover them loosely with foil.
- Cool: Let the pie cool completely on a wire rack for at least 4 hours before slicing. This cooling time allows the cornstarch to fully set the juices, preventing a soupy slice.
Notes
- If using frozen berries, do not thaw them first. Mix them directly into the sugar and cornstarch mixture. You may need to add 5-10 minutes to the total bake time.
- For an extra flaky crust, keep all butter and water extremely cold throughout the mixing process.
- If you are interested in structured eating plans, consider looking into meal planning services to help organize your week.
Nutrition
- Serving Size: 1 slice
- Calories: 450
- Sugar: 35g
- Sodium: 250mg
- Fat: 25g
- Saturated Fat: 15g
- Unsaturated Fat: 10g
- Trans Fat: 0g
- Carbohydrates: 55g
- Fiber: 4g
- Protein: 5g
- Cholesterol: 60mg
