 Skip to content
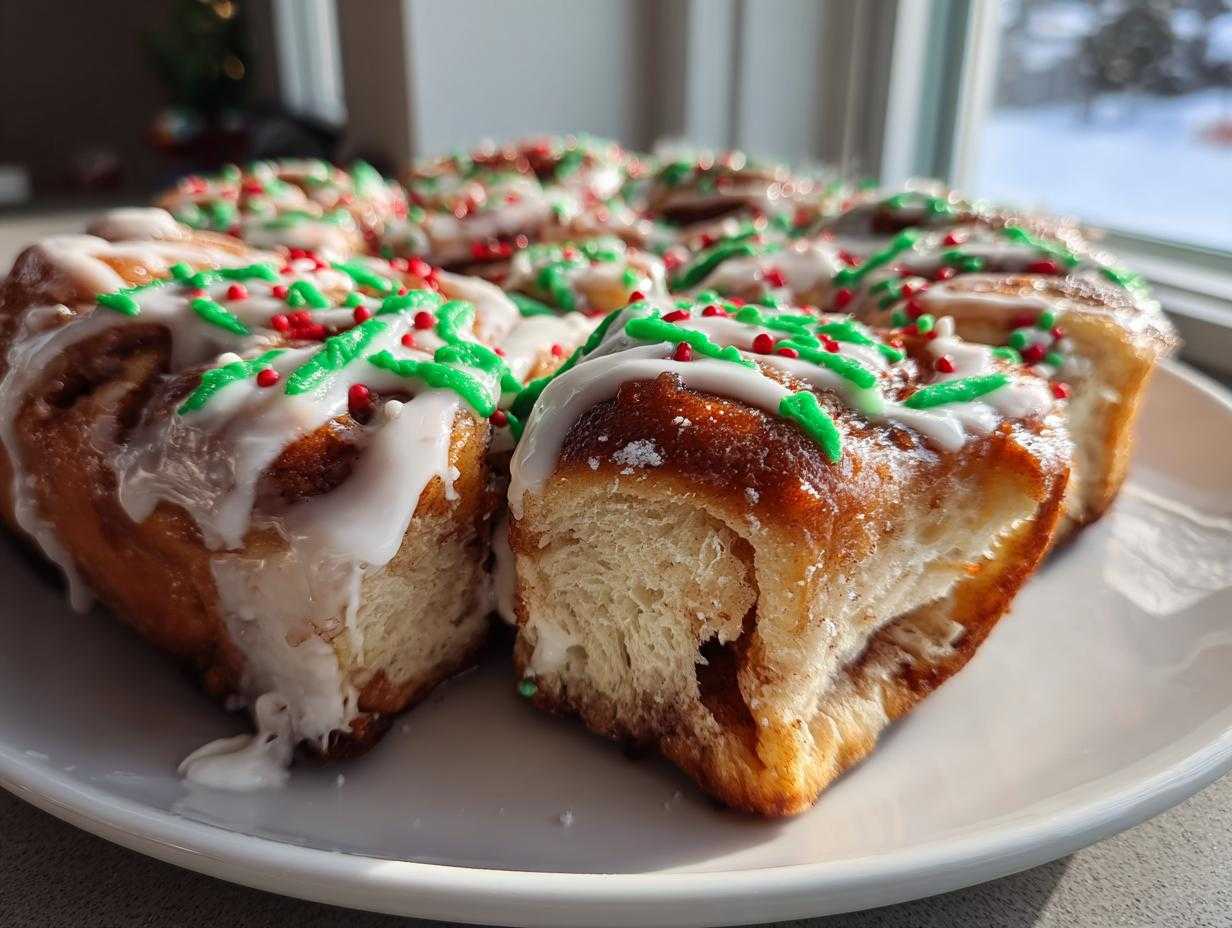

You know those mornings when the air is cold, the lights are twinkling, and you crave something truly special to kick off the holiday magic? I used to think big, impressive bakes like that meant hours trapped in the kitchen—which, heaven knows, was the last thing I needed after years staring at spreadsheets during my corporate grind until I found my own path to peace here in the kitchen. If you want to know more about how I switched from burnout to baking joy, check out my story on the About Page!
Well, ditch that stress! I want to show you how to create these absolutely stunning **christmas tree cinnamon rolls**. They look like they took all day, but they are shockingly simple. This pull-apart tree is the easiest centerpiece dessert you’ll ever make, proving once again that incredible food doesn’t have to be complicated.
- Why These Christmas Tree Cinnamon Rolls Are Your New Holiday Favorite
- Gathering Ingredients for Your Christmas Tree Cinnamon Rolls
- Step-by-Step Instructions for Shaping Christmas Tree Cinnamon Rolls
- Tips for Perfect Pull-Apart Christmas Tree Cinnamon Rolls
- Variations for Your Christmas Tree Cinnamon Rolls
- Serving Suggestions for These Holiday Breakfast Ideas
- Storage and Reheating Instructions for Leftover Christmas Tree Cinnamon Rolls
- Frequently Asked Questions About Christmas Tree Cinnamon Rolls
- Share Your Pure Cooking Joy
Why These Christmas Tree Cinnamon Rolls Are Your New Holiday Favorite
This recipe hits that sweet spot I always talk about: maximum wow factor with minimum fuss. Seriously, seeing this beautiful tree on your counter—before you even tear into it—is half the fun. They look like something you’d see in a magazine dedicated to amazing Holiday Breakfast Ideas, but trust me, they’re faster to assemble than most weeknight dinners.
The Ultimate Christmas Centerpiece Dessert
Forget wrestling with a complicated yeasted dough. This pull-apart style lets you create a showstopper that screams celebration. Assembling it on the baking sheet makes it a natural focal point for any Christmas Brunch Recipes spread. It’s designed to look incredible when it comes out of the oven, ready for everyone to gather around.
Achieving Fluffy Cinnamon Rolls with Minimal Effort
Since we’re skipping the lengthy kneading and rising, how do we get that fluffy, soft texture everyone wants? Simple: that quick dip in melted butter, brown sugar, and cinnamon works magic before they even hit the oven. It locks in moisture, ensuring every single piece, even the ones on the edge, turns out soft and gooey. This is truly the definition of Easy Holiday Baking for delicious results.
Gathering Ingredients for Your Christmas Tree Cinnamon Rolls
Ready to pull this gorgeous centerpiece together? Since my whole goal here is making cooking joyful, not stressful, we are leaning heavily on a convenience item that seriously pays off. Don’t mess with proving yeast when you’re trying to enjoy the holidays! We’ll elevate the canned dough with a quick dip in a homemade sugar-butter mixture. This small step is your secret weapon for keeping these **christmas tree cinnamon rolls** unbelievably soft. Trust me on this one; this little extra effort makes all the difference.
Dough and Filling Components
For the base, you absolutely want the jumbo size rolls—they puff up beautifully and give you the best size dough pieces for shaping the tree outline. They are just so accessible, which is exactly what I needed when I was first getting back into the kitchen after feeling totally swamped by my old desk job. Efficiency equals joy!
- One standard can of refrigerated jumbo cinnamon rolls—honestly, the Pillsbury ones work wonderfully here.
- We need about a quarter cup of unsalted butter, melted down nice and smooth.
- Then, pack in that light brown sugar—about a quarter cup of it—for that deep, caramel flavor.
- And finally, a solid tablespoon of ground cinnamon. This is what makes that buttery dip smell incredible while it bakes!
Creating the Festive Glaze for Your Christmas Tree Cinnamon Rolls
We use the icing that comes in the can first; don’t throw that away! But for the real holly, jolly look, we need a bright, professional-looking drizzle. This is where we make these into those fantastic Decorated Breakfast Pastries.
- A half cup of powdered sugar is the base for our custom glaze.
- You’ll need just a couple of tablespoons of milk—maybe a little more or less—to get the perfect drizzle consistency.
- And for the fun part? Just a few drops of green food coloring will turn this into vibrant holiday icing for your **christmas tree cinnamon rolls**! If you’re feeling extra fancy, a jar of holiday sprinkles is a must-have addition for the final look.
Step-by-Step Instructions for Shaping Christmas Tree Cinnamon Rolls
Okay, this is where the magic happens! Don’t let the tree shape intimidate you. I promise, once you see how it comes together using simple cuts, you’ll be ready to tell everyone you made these incredible **christmas tree cinnamon rolls** from scratch. Remember, the key to those super soft results is how we treat these little dough bundles before they even see the oven. This method ensures we get the perfect gooey texture we look for in all my best sweet bake recipes.
Preparing the Dough Pieces and Filling
First things first, crank that oven up to whatever temperature your can recommends—preheating is key! Grab your sheet pan, give it a good greasing, or toss down some parchment paper for super easy cleanup later. Now for the fun part: open those rolls and save those icing packets immediately; we need those later for topping. Take your time cutting each full roll into four equal, little pillow shapes. Then, grab that melted butter and sugar mixture we made. Dip each small dough piece, coating it lightly on both sides. This step is what guarantees those amazing, rich bottoms that lead to truly Fluffy Cinnamon Rolls.
Assembling the Pull Apart Bread Recipe Tree Shape
This is the shape-making part, and you need to visualize a triangle! Start at the bottom center of your baking sheet. Lay down a base row using 7 of your coated dough pieces. Then, the next row up gets 6, then 5, then 4, 3, 2, and finally top it off with just 1 piece for the very peak of the tree. Leave just a tiny little hair’s breadth of space between each piece. They need room to grow and meld together as they bake, which creates that wonderful pull-apart effect we love in Shaped Pastries. Don’t stress too much about perfect symmetry; slightly wonky trees have more character anyway!

Baking and Glazing Your Festive Cinnamon Rolls
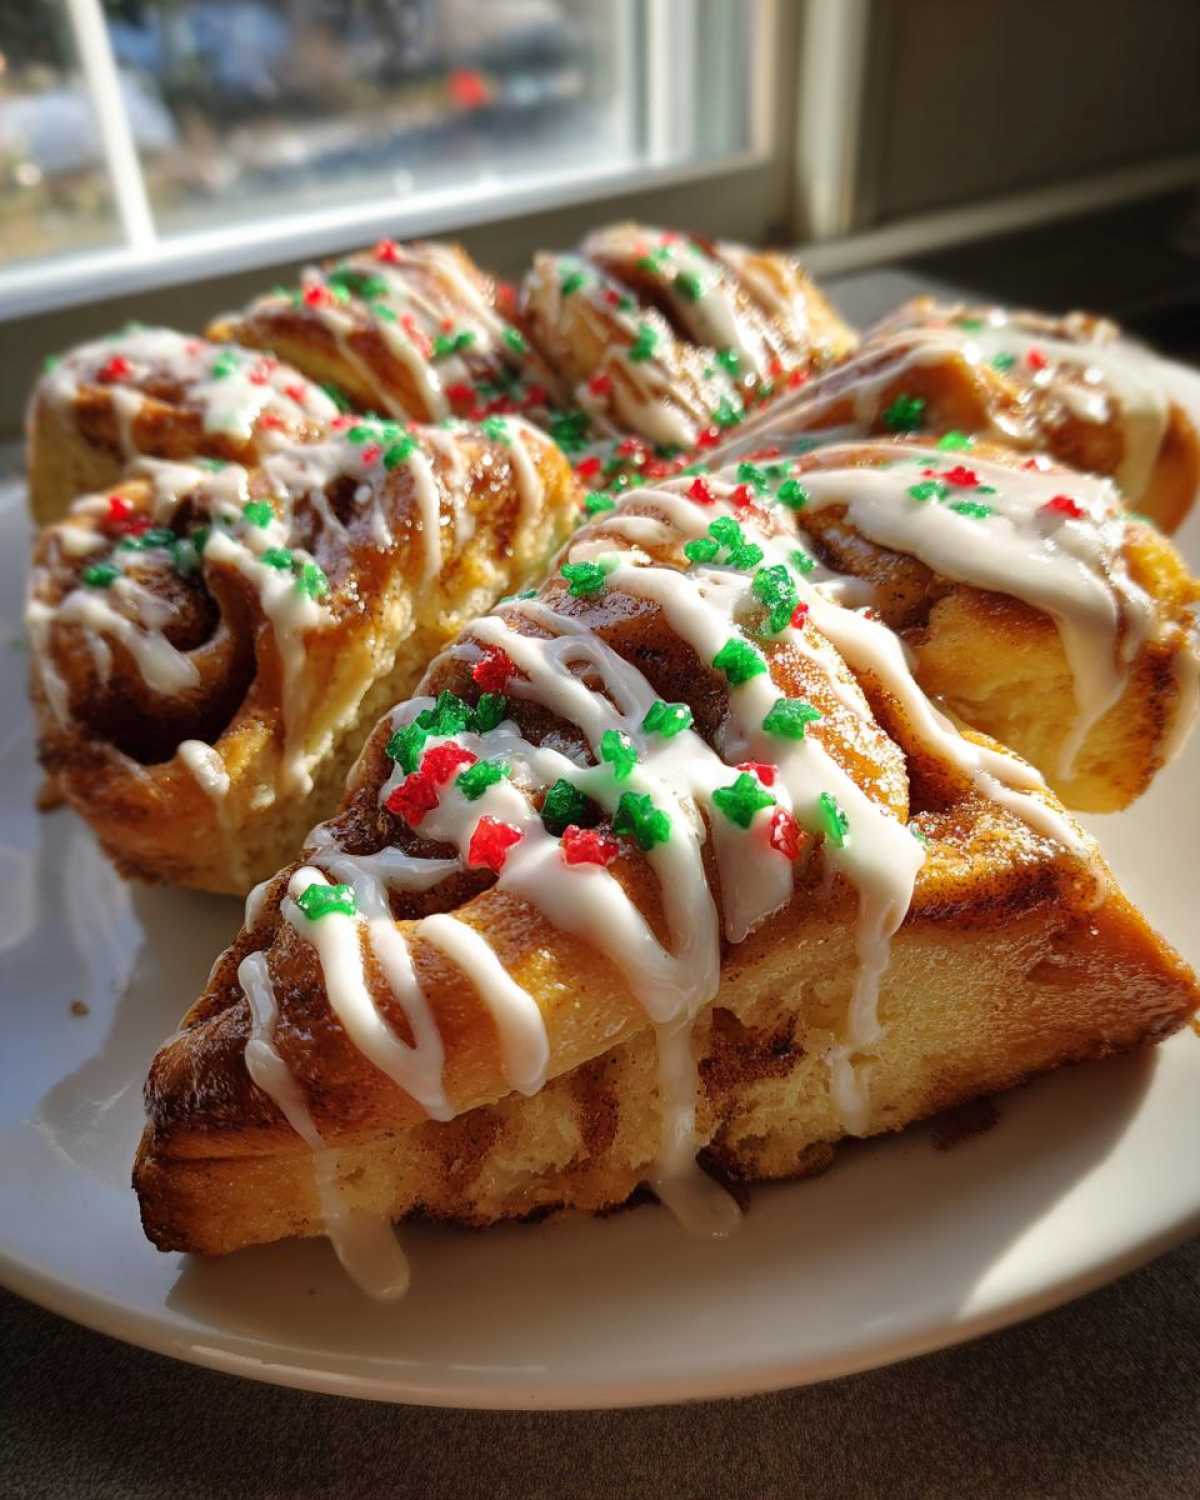
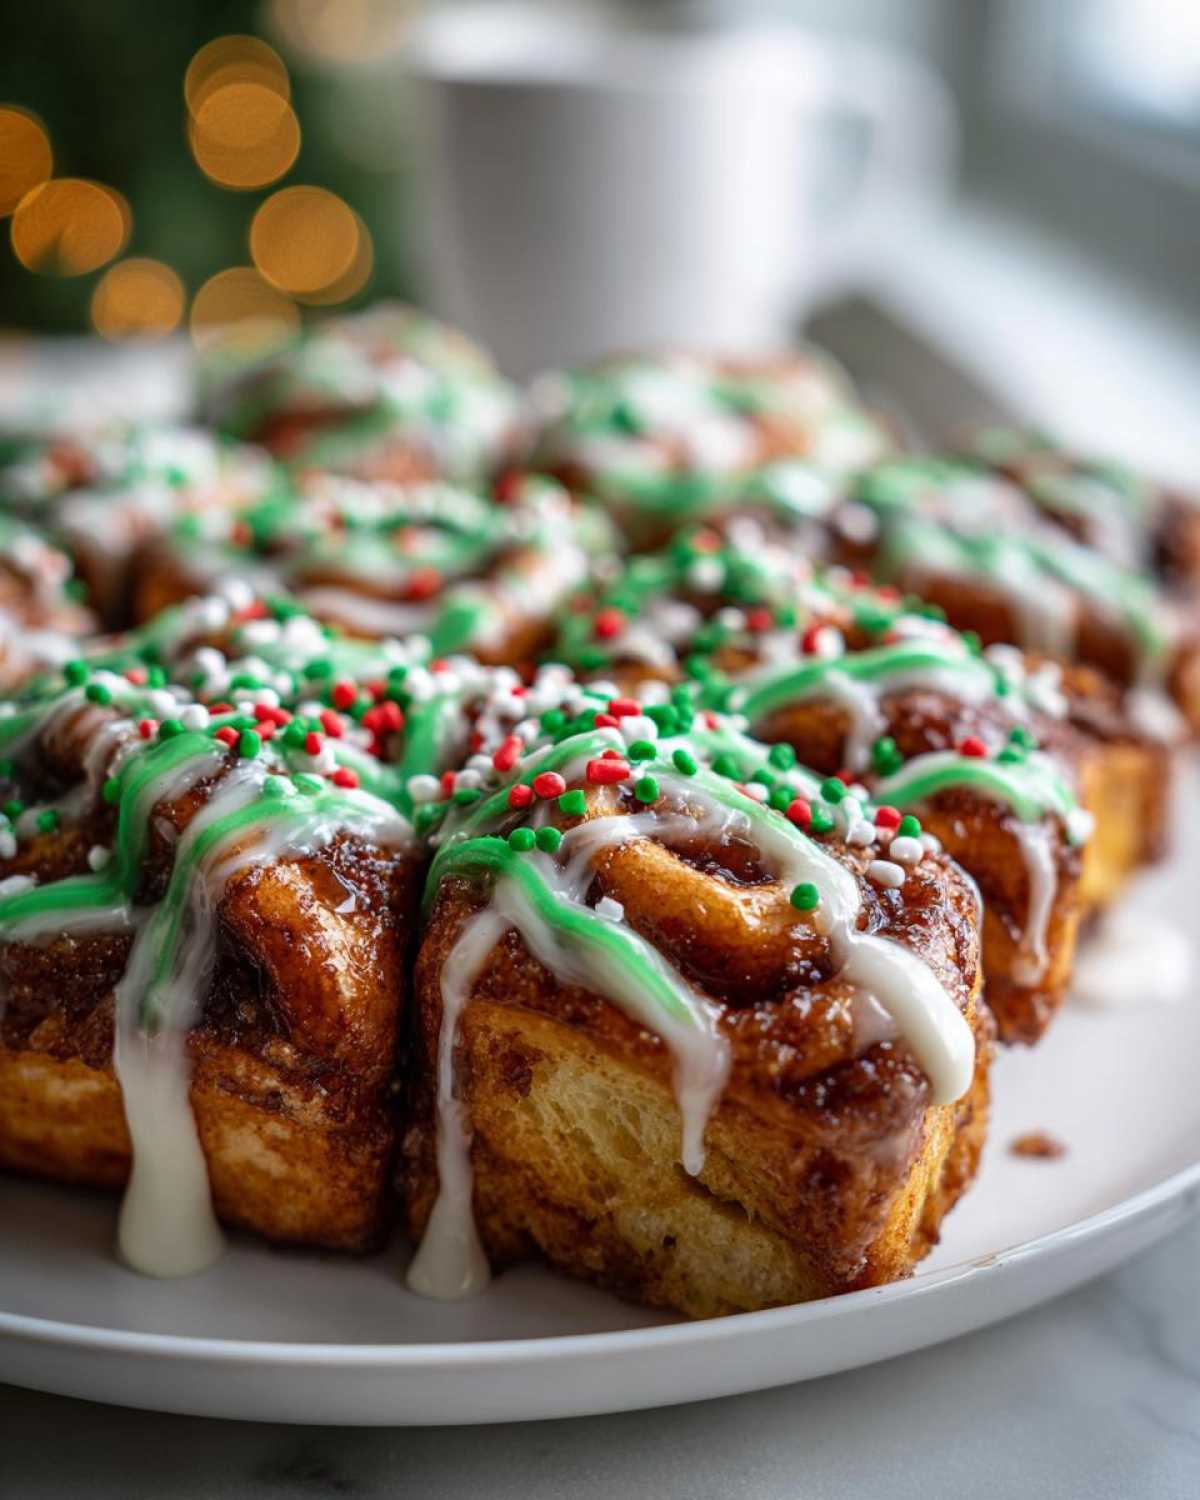
Bake these according to the package directions. Keep an eye on them so you don’t burn the cinnamon edges! As soon as they come out of the oven, while they are still hot, take those reserved packets of icing and drizzle them all over the tree. The heat melts it perfectly into every crevice. If you made the optional green glaze, let the rolls cool for just about ten minutes before drizzling that bright color over the top. Finish it off with your holiday sprinkles so it looks like a beautifully decorated tree. This process ensures they bake up beautifully for perfect Glazed Holiday Bakes.
Tips for Perfect Pull-Apart Christmas Tree Cinnamon Rolls
As someone who went from stressing over every meal to finally finding pure joy in making food that feeds my soul, I live for these little hacks that make the final result even better. These little tweaks are what turn a simple bake into something truly memorable for your holiday table. We want perfectly soft centers and maximum festive impact for every single one of these **christmas tree cinnamon rolls**.
Ensuring Softness and Gooey Centers
The biggest mistake people make when assembling pull-apart doughs is overcrowding! If you pack them too tightly now, they steam instead of bake, and you end up with a doughy middle. Make sure you leave those tiny gaps between each piece, just like I explained in the assembly section. They need room to breathe and grow outwards. Also, timing your icing drizzle is essential for that classic gooey texture. Make sure you get your can icing—the one that came with the rolls—on them the absolute second they come out of the oven. That residual heat melts the icing just enough so it seeps down into all those crevices. It’s faster than making a full glaze and gives you that classic Cinnabon-style gooey layer. If you are looking for a harder-set glaze for cookies later, you should check out my sugar cookie icing guide, but for these rolls, warm melt is king!
Making Ahead for Cozy Winter Mornings
Let’s be real: Christmas morning is chaos, and who wants to spend an extra 45 minutes baking before coffee? This is one of my favorite recipes for Make Ahead Holiday Desserts because it sets up beautifully the night before. After you assemble the tree shape on the baking sheet—before you bake it—just cover the whole pan tightly with plastic wrap. Pop it into the fridge overnight. When you wake up, you just need to let it sit on the counter for about 15 minutes while the coffee brews. Then, slide it right into the oven, but you must add about 5 to 10 extra minutes to the baking time since the dough is cold. That way, your kitchen smells amazing when everyone else wakes up!
Variations for Your Christmas Tree Cinnamon Rolls
So, you nailed the classic look, and now you’re thinking, “What else can I do with these amazing **christmas tree cinnamon rolls**?” That’s the spirit! Since I believe in making food approachable but also encouraging creativity, I love seeing how people adapt this shape. Whether you prefer the deep satisfaction of scratch baking or need a quick flavor boost, we have options to keep this recipe fresh year after year.
Homemade Dough vs. Canned Dough Hacks
I know I lean heavily on the canned dough because it keeps the prep time under 20 minutes, which is perfect for those chaotic holiday mornings. But if you already have a favorite recipe for yeast dough—maybe the one I perfected for my cinnamon apple bread, which shares similar base flavors—feel free to swap it out! Just remember, homemade dough tends to rise a bit more aggressively, so when you cut those little pieces, you might need to add one or two fewer pieces to each row when assembling the triangle shape. Always lean toward slightly less dough if you are unsure; we don’t want a flat, dense tree!
Alternative Flavor Twists
If you want to move beyond the standard cinnamon sugar, try mixing up the filling or the orange. This dough is just a blank canvas for holiday flavors! You absolutely can fold in toasted pecans or walnuts into that butter/sugar dip; they get wonderfully soft in the oven and add a great little texture contrast. Another flavor I love bringing in for a brighter holiday taste is orange zest. Grate a teaspoon of fresh orange zest right into that melted butter mixture. The citrus brightens up the whole roll, making them taste unbelievably fresh. It turns a simple bake into something truly gourmet without adding any stress!
Serving Suggestions for These Holiday Breakfast Ideas
Now that you have your magnificent **christmas tree cinnamon rolls** ready—soft, gooey, and festive—you need the perfect accompaniments to make this truly epic. Remember, food is a love language, and the right pairings make the whole meal feel complete and celebratory. These rolls are rich and sweet, so we want side dishes that balance that out or complement that cozy winter morning vibe.
My go-to strategy for a massive sweet bread like this is to lean into brunch classics that offer a little savory contrast. If you’re looking for another amazing centerpiece that leans savory but still feels special, you absolutely must check out my recipe for Fluffy Brioche French Toast—it pairs perfectly when you need something that isn’t sweet for the kids!
For drinks, you can’t go wrong with a big pot of strong black coffee to cut through the sweetness. Or, if we’re talking holiday showstoppers, hot chocolate is mandatory. Seriously, having mugs of rich, dark hot chocolate alongside these warm, sticky rolls is pure bliss.
If you want something savory on the side to balance out the sugar rush, keep it simple. A nice platter of thick-cut bacon or some scrambled eggs keeps everyone happy. You don’t need complex recipes when the star of the show is a towering, pull-apart tree of cinnamon goodness!

Storage and Reheating Instructions for Leftover Christmas Tree Cinnamon Rolls
I always hope there are leftovers, even though my family attacks these **christmas tree cinnamon rolls** like hungry polar bears on Christmas morning! The good news is that because we dipped the dough in that buttery, sugary mix, these rolls tend to hold their moisture better than standard ones. But keeping them soft for the days following the big event requires a little know-how.
If you have any of this glorious tree left, store it right on the counter, covered tightly with plastic wrap or aluminum foil. They should be fine at room temperature for about two days. The humidity from the glaze helps keep them soft! If you need them to last longer, move them to the refrigerator, but make sure they are sealed incredibly well so they don’t dry out next to the leftovers from Christmas dinner.
Reheating is the real secret to bringing them back to life. You want them warm, gooey, and smelling like you just pulled them out fresh. I swear by the microwave for instant gratification. Just tuck one or two pieces onto a small plate and zap them for about 10 to 15 seconds. They come out unbelievably soft!
If you have a larger section of the tree you want to revive, take it out of the fridge about 30 minutes before you plan to reheat it. Then, you can wrap the whole section loosely in foil and pop it into a 300°F (150°C) oven for about 8 to 10 minutes. This gentle heat warms it all the way through without making the outside crispy. It’s the best way to enjoy those leftover **christmas tree cinnamon rolls** on a quiet, **Cozy Winter Morning**!
Frequently Asked Questions About Christmas Tree Cinnamon Rolls
These **christmas tree cinnamon rolls** are so popular, and I get asked the same few questions every year! That tells me you all are serious about making this the best holiday breakfast ever. If you ever have a question I haven’t answered down here, please shoot me a message on my Contact Page—I love hearing from you!
Can I make the tree shape without using canned dough?
Absolutely, yes! If you’re a seasoned baker and prefer your own yeast dough, go for it! The flavor of a homemade dough is always superior, and I mention in the variations section how you can use it. The main thing to remember is that homemade dough usually proofs up bigger and faster than the canned stuff. Because of that, you might need to slightly reduce the number of pieces you use in those lower rows when you are assembling the tree shape. You want good spacing so they bake evenly and don’t turn into one giant, glorious, but misshapen lump!
What can I use instead of green food coloring for the glaze?
That bright green drizzle is so cute, but I totally get wanting to skip the artificial colors sometimes. If you want a natural tint for those **Festive Cinnamon Rolls**, I have two great ideas! Tiny bit of matcha powder mixed right into your powdered sugar and milk glaze works like a charm. It gives a lovely, earthy green tint that tastes way more sophisticated. Or, if you can find it, a teensy pinch of spirulina powder (which is just dried algae) will give you the brightest green color without adding any weird flavor compared to the matcha. Just be careful—a little goes a long way!
How do I prevent my Festive Cinnamon Rolls from sinking in the middle?
A sunken bake is usually caused by two things, and both are easy to fix when assembling your beautiful **christmas tree cinnamon rolls**. First, spacing! Make sure you aren’t cramming those dough pieces together when you lay them out on the sheet. They need room to puff up and bake all the way through; if they are touching too much initially, the center stays doughy and collapses as it tries to expand in the heat. Second, make sure the center is actually done when you pull them out. Don’t just rely on the edges looking set! If you gently poke the dough between the center rolls with a toothpick, it should feel just soft, not wet. If it feels squishy, bake for another three minutes and try testing again!
Share Your Pure Cooking Joy
I poured my heart into showing you how to make these gorgeous **christmas tree cinnamon rolls**, and honestly, the best part of sharing these recipes is seeing you all bring them to life in your own kitchens! I truly believe that cooking should feel like a rewarding, peaceful activity—that’s the Pure Cooking Joy experience I want for everyone.
So, when you whip up this beautiful tree for your next gathering, please don’t keep that joy to yourself! Snap a picture of your finished creation—especially your green glaze and sprinkles looking perfect—and share it with the community. Tag me or join the fun over on our Facebook page where we chat about all things easy and delicious at our main Facebook page. Seeing your feedback and photos makes my day, and it helps other home cooks feel confident trying something new!
If you loved how simple this centerpiece was for your holiday brunch, hit that rating button! Good ratings help others find these stress-free recipes. Happy baking this season!
PrintPull-Apart Christmas Tree Cinnamon Rolls

Create a festive centerpiece for your holiday table with these pull-apart cinnamon rolls shaped like a Christmas tree. This recipe uses store-bought dough for simplicity, making it an easy and joyful bake for Christmas morning or brunch.
- Prep Time: 15 min
- Cook Time: 20 min
- Total Time: 35 min
- Yield: 12 servings 1x
- Category: Breakfast
- Method: Baking
- Cuisine: American
- Diet: Vegetarian
Ingredients
- 1 (12.4 ounce) can refrigerated jumbo cinnamon rolls (such as Pillsbury Grands!)
- 1/4 cup unsalted butter, melted
- 1/4 cup packed light brown sugar
- 1 tablespoon ground cinnamon
- 1/4 cup powdered sugar (for glaze)
- 1–2 tablespoons milk (for glaze)
- Green food coloring (optional, for festive glaze)
- Holiday sprinkles (optional, for decoration)
Instructions
- Preheat your oven according to the directions on the cinnamon roll can. Lightly grease a large baking sheet or line it with parchment paper.
- Unroll the cinnamon rolls. Separate the icing packets and set them aside for later.
- In a small bowl, mix the melted butter, brown sugar, and ground cinnamon together to create the cinnamon filling mixture.
- Cut each cinnamon roll into four equal pieces. You will have 48 small pieces total from 12 rolls.
- Dip each small piece of dough into the cinnamon filling mixture, coating both sides lightly.
- Arrange the coated pieces on the prepared baking sheet in the shape of a triangle or Christmas tree. Start with a base row of 7 pieces, then 6, 5, 4, 3, 2, and top with 1 piece for the trunk area, leaving a small space between pieces so they can expand. You may need to adjust the number of pieces per row based on your dough size.
- Bake for the time specified on the can, or until the rolls are golden brown and cooked through.
- While the rolls bake, prepare the glaze. Whisk together the powdered sugar and milk until smooth. Add a few drops of green food coloring if desired.
- Remove the rolls from the oven. Immediately drizzle the reserved icing packets over the warm rolls.
- If using the green glaze, drizzle it over the rolls once they have cooled slightly.
- Decorate with holiday sprinkles before serving. Pull apart the warm rolls to enjoy.
Notes
- For a richer flavor, you can use your favorite homemade cinnamon roll dough instead of canned dough.
- If you want a thicker, brighter green glaze, use less milk and more powdered sugar, adding green food coloring until you reach your desired shade.
- This recipe is great for meal planning; you can assemble the tree shape the night before, cover it, and refrigerate it. Add 5-10 minutes to the baking time if baking directly from the refrigerator.
Nutrition
- Serving Size: 1 piece
- Calories: 350
- Sugar: 30g
- Sodium: 450mg
- Fat: 18g
- Saturated Fat: 7g
- Unsaturated Fat: 8g
- Trans Fat: 0g
- Carbohydrates: 45g
- Fiber: 1g
- Protein: 5g
- Cholesterol: 20mg
